Hi codeteasers,
In previous post we had discussed about basic of middleware.In this post we will see some different aspects of middleware. Before starting new aspects of middleware at first revised what we had learnt previously.
-
- What is middleware?
- Basic examples of middleware containing single middleware and containing multiple middleware.
- Functionality of Middleware.
- Types of Middleware

In this post we will learn how and where we have to use different types of middleware.So, before starting new concepts about middleware at first I summarized previous concept about middleware.
- Conceptually middleware is a way to encapsulate functionality that operates on an HTTP request to your application.
- Middleware is simply a function that contains three parameters req, res and next.
            var express=require('express');

            var app=express();

            app.use(function(req,res,next){
               console.log('hello middleware');
              });
           app.listen(3000);
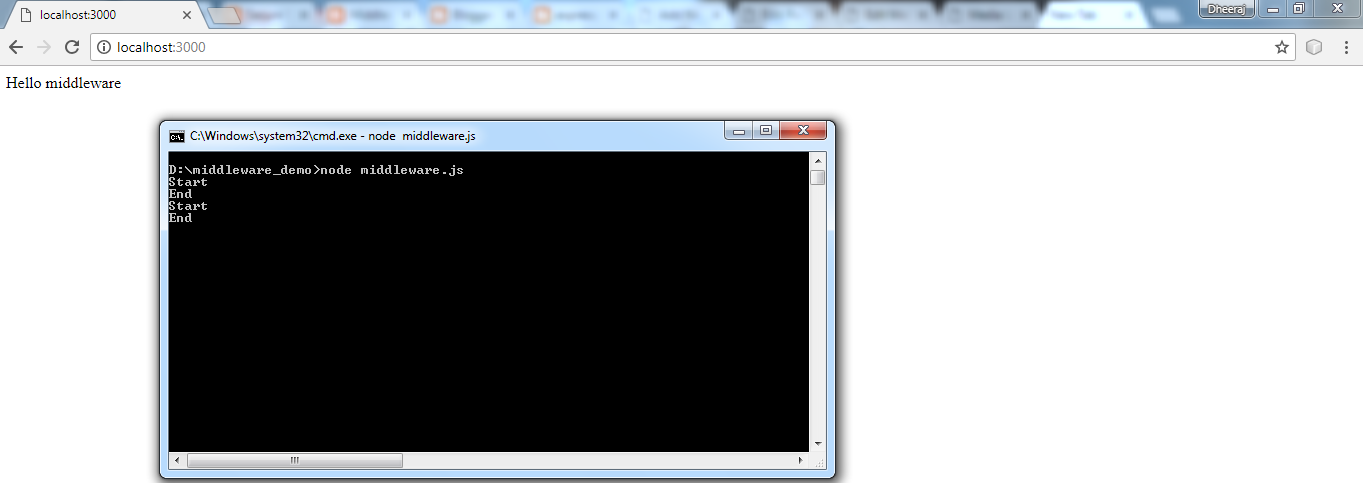
Run application
Open command prompt and run command
node middleWare.js
After that to see your result open your browser and copy link.
localhost:3000
After refreshing browser you got hello middlewaremessage on your console.
- Middleware has access to request and response object.
- Next method tells middleware to use next middleware , if inside a middleware you don’t call next() method then at that middleware our request terminates.
Now we come to point that inside this post we will learn about different types of middleware and how to use these middleware.
Conceptually middleware is classified into five categories.
- Application-level middleware
- Route-level middleware
- Error handling middleware
- Built-in middleware
- Third-party middleware
Application-level middleware
A middleware that effects whole application is known as application level middleware.
Application-level middleware starts with app.use and app.method.
for further understanding of Applicaton-level middleware we go through an Example.
Var app=require(‘express’);

app.use(function(req,res,next){

console.log(‘Hello Application-level middleware’);
});
app.listen(3000);
Run application
Open command prompt and run command
node applicationmiddleWare.js
After that to see your result open your browser and copy link.
localhost:3000
After refreshing browser you got Hello Application-level middlewaremessage on your console.
where app denotes objects for whole application
Route-level middleware
Rout-level middleware is same as Application-level middleware but basic difference is that it bound instance of express.Router() instead of express() .
       Var express=require(‘express’);

        var router= express.Router();

       router.use(function(req,res,next(){

       console.log('Router middleware Router Example first middleware');

       /* to call next middleware we use next method*/

      next();

      });
     app.listen(3000);
Run application
Open command prompt and run command
node routmiddleWare.js
After that to see your result open your browser and copy link.
localhost:3000
After refreshing browser you got Router middleware Router Example first middlewaremessage on your console.
Error handling middleware
Error handler middleware is same as other middleware like Application-level middleware and
Route-level middleware functions but difference is that it contains four parameters instead of three parameters.
var express=require('express');

var app=express();

 app.use(function(err,req,res,next){

     console.error(err.stack)

     res.status(500).send('Something broke');


});

app.listen(3000);
Run application
Open command prompt and run command
node errormiddleWare.js
Built-in middleware
The middleware functions that previously included with Express but now seperate in express modules.
Express has following built-in middleware functions.
Third-party middleware
Express apps uses third party modules for adding functionality of application.
Installing required node.js module for adding required functionality inside application.
Below example shows installing and loading the cookie-parsing middleware function cookie-parser.
Installing cookie-parser
npm install cookie-parser
Implementation
      var express = require('express');

      var app = express();

      var cookieParser = require('cookie-parser');

      // load the cookie-parsing middleware

      app.use(cookieParser())
You should also visit
Use Ejs with Express.js
Node.js Database Connectivity with Postgresql