MongoDb installation on Windows 32 bit System

MongoDb is a document database with the scalability and flexibility. It is NOSQL Database.

Some Important points regarding MongoDb

  • MongoDb stores data in flexible, JSON-like documents, meaning fields can vary from document to document and data structure can be changed over time.
  • The document model maps to the objects in your application code, making data easy to work with
  • Ad hoc queries, indexing, and real time aggregation provide powerful ways to access and analyze your data
  • MongoDb is a distributed database at its core, so high availability, horizontal scaling, and geographic distribution are built in and easy to use

But In this post I am discussing more about MongoDb you can obtain these contents from MongoDb Official website.

“At this time our primary concern is how to install MongoDb on Windows 32 bit system.”

Note: You can install MongoDb for other operating system from official website.

Now, We come to our point that is not installing MongoDb on windows or other operating system of 64 bit.For installing 64 bit MongoDb you can visit MongoDb official page.So now we come to point to full-fill  our purpose for that I will go to official page of mongoDb

Download MongoDb for 32 bit system

mongodb_installation_page

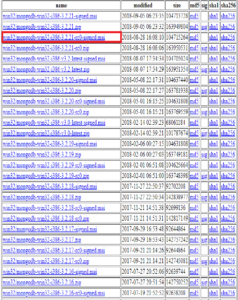
Click above link after that install MongoDb for windows 32 bit system. You can either download  and then install .msi file or you can also download zip file and extract on specified location. I have downloaded highlighted .msi file and then install it on my system.

Now, I  am assuming that you have already download and install MongoDb file on your system. After installing MongoDb open your cmd terminal and type mongod command and after that your terminal shows


mongod

MongoDb error

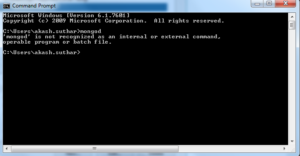
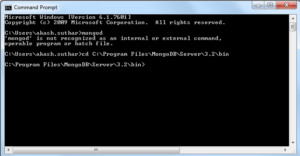
It shows from this location you can’t access MongoDb. So, for resolving problem we have to replace our directory location with MongoDb bin folder location for this purpose we have to type


cd C:\Program Files\MongoDB\Server\3.2\bin

After that our terminal will be look like

change MongoDb directory

But before moving forward we have to follow some more steps.

  1. Create a data folder inside your root derive (suppose you have install mongoDb inside your c derive program file then you have to create data folder inside c derive.
  2. Create db folder inside data folder

After that I am executing mongod command on my cmd and finding storage Engine Problem

change storage Engine Problem

For resolving this problem I have to change storage Engine from wiredTiger to mmapv1.

Note: By Default storage Engine is wiredTiger but that is not supported by 32 bit system so, we have to change it from our own side. But don’t worry this task is not  rocket science but also after executing a simple command we can be able to change our storage Engine from wiredTiger to mmapv1.

So, Execute given command

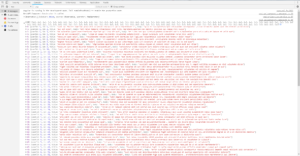
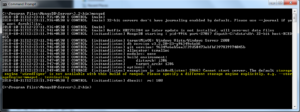
mongod --storageEngine=mmapv1 

After that my terminal will look like

resolve storgeEngine

Highlighted line inside image shows that our mongoDb server has been started and by Default it’s port number is 27017.

For performing operation of MongoDb just follow these following steps

  1. Open another cmd terminal
  2. Change root folder with MongoDb bin folder for this execute command cd C:\Program Files\MongoDb\Server\3.2\bin
  3. Then execute mongo command

mongoDb Panel

Yeah now I can be able to execute MongoDb Shell commands.

Note: For executing MongoDb command still I had done a temporary path setup for permanent path set up just follow these steps

  1. open a new terminal and
  2. Type comamnd setx PATH “C:\Program Files\MongoDB\Server\3.2\bin”
  3. close terminal

You can also Learn

Angular 4

Express.js

Node.js

Rest API in Angular 4

Download Code Download From Github


I am working on Angular 4 before last few couple of months and now good command on it and each day passes with some new experiments and lots of learning. But it could not be possible in a single day but with practice of hours and day after day learning. So, I am sharing couples of things with you with Angular 4 Rest API. I will also provide an example how to use API with Angular 4.

So, now let’s ready for a deep dive for couple of minutes for learning use of Rest API with Angular 4. As we know that Angular Services provides flexibility for reusing code in our Application, with help of it we can be able to use methods and properties multiple times after adding few lines in our application. So it is good habit to define Rest APIs inside Angular services. Now for this purpose we have to need one component and one service,

Service: Contains definition of function that returns APIs result.

Component: Use result of return data from Angular service and then use return inside Angular Component.

So now let’s code for this purpose I have design an Application named RestApiTester and for this purpose I have simple write command ng new RestApiTester as I have discussed in previous lessons, after that my application is ready for further operations.

Now I am creating a component named restAPIComponent and a service named restAPIService.

Here I am creating component using angular-cli command ng g component restAPIComponent and Angular component will be created and similarly using angular cli command ng g service restAPIService for creating Angular service.

For getting data from APIs in Angular we have to add some packages inside app.module.ts HttpClientModule, HttpModule because without them we can’t be able to get result.

So At first make changes inside our app.module.ts file then we will move further. As we know that after executing angular-cli command ng g component component_name and service ng g service service_name some auto change will be occurred so after that our app.module.ts file will be look like this
app.module.ts


import { BrowserModule } from '@angular/platform-browser';
import { NgModule } from '@angular/core';

import { AppComponent } from './app.component';
//Import Component
import { RestApicomponentComponent } from './rest-apicomponent/rest-apicomponent.component';
//import Service
import {RestApiserviceService} from './rest-apiservice.service';

@NgModule({
  declarations: [
    AppComponent,
    RestApicomponentComponent
  ],
  imports: [
    BrowserModule
  ],
  providers: [],
  bootstrap: [AppComponent]
})
export class AppModule { }

Because we want to get result from APIs so we have to make more changes i.e. in terms of adding some packages and importing some modules and also adding routing modules inside our app.moodule.ts, So after that our code will be look like this
app.module.ts


import { BrowserModule } from '@angular/platform-browser';
import { NgModule } from '@angular/core';
import { AppComponent } from './app.component';
//Import Component
import { RestApicomponentComponent } from './rest-apicomponent/rest-apicomponent.component';
//import Service
import {RestApiserviceService} from './rest-apiservice.service';
//Import RouterModule
import{RouterModule,Router} from '@angular/router';
//import HttpClientModule
import {HttpClientModule} from '@angular/common/http';

@NgModule({
  declarations: [
    AppComponent,
    RestApicomponentComponent
  ],
  imports: [
    BrowserModule,
    //import HttpClientModule
    HttpClientModule,
    //Routing pages  
    RouterModule.forRoot([
      {path:'all',component:RestApicomponentComponent}
    ])
  ], 
  //Adding Service inside Provide array
  providers: [RestApiserviceService],
  bootstrap: [AppComponent]
})
export class AppModule { }

We have made changes inside our front end and for this purpose we have to use bootstrap and finally our layout of project is looks like

root_page_Angular

For this we have to write these few lines of code inside app.component.html file

app.component.html file


<div style="margin:10px;">
  <div class="container">
    <h2 class="text-center">Rest API Testing Example</h2>
    <nav class="nav nav-pills flex-column flex-sm-row">
      <a class="flex-sm-fill text-sm-center nav-link active" [routerLink]="['/all']">Get All Data</a>
      <a class="flex-sm-fill text-sm-center nav-link disabled" href="#">Link</a>
      <a class="flex-sm-fill text-sm-center nav-link disabled" href="#">Link</a>
      <a class="flex-sm-fill text-sm-center nav-link disabled" href="#">Disabled</a>
    </nav>
  </div>
</div>
<router-outlet></router-outlet>

Note : We have to use routerLink on Get All Data tab for access restAPIComponent component

Because we want to result from API so, for this purpose we will have to make some changes inside our service page but before it at first view how our service page looks like before made changes.

rest-apiservice.service.ts


import { Injectable } from '@angular/core';

@Injectable()
export class RestApiserviceService {

  constructor() { }

}

Note: for getting data from API we are using a https://jsonplaceholder.typicode.com/ platform. So, moving further I will suggest you go click link and visit site.

Before calling data from API we have to make change inside our service page so that we can be able to interact with our API. After making changes inside our service page it will be looks like

rest-apiservice.service.ts


import { Injectable } from '@angular/core';
//import Http packages
import {HttpClient} from '@angular/common/http';
// import{HttpClientModule} form '@angular/http';
@Injectable()
export class RestApiserviceService {
  public allData;
  public baseUrl='https://jsonplaceholder.typicode.com/posts';
  
  constructor(public http:HttpClient) { }
  public getAllData():any{
     let allData=this.http.get(this.baseUrl);
     console.log(allData);
     return allData;
  }

}

please have a look I have opened my console for getting output and our console output page will be looked like

Angular_component_output

Yeah I got my output now my next target is to get these results in tabular form on our component html page and for this purpose I have added following lines of code on my rest-apicomponent.component page.
rest-apicomponent.component


<div class="container-fluid">
    <h5 class="text-center border">Get 100 Records </h5>
  <!-- Checking condition for data is exiting or not -->
  <div class="row" *ngIf="allData.length>0">   
  <table class="table">
    <thead class="thead-dark">
      <tr>
        <th scope="col">Id</th>
        <th scope="col">UserId</th>
        <th scope="col">Title</th>
        <th scope="col">Body</th>
      </tr>
    </thead>
    <tbody>  
    <!--Loop for getting data inside row --> 
    <tr *ngFor="let postData of allData">
      <td>{{postData.id}}</td>
      <td>{{postData.userId}}</td>
      <td>{{postData.title}}</td>
      <td>{{postData.body}}</td>
    </tr>
    </tbody>
  </table>
</div>
</div>

Go For Live Demo

Angular 4 Service Tutorial

During developing Angular application we come across a situation where we need to write some lines of code everywhere inside our application. One simple way is to write code everywhere that is needed, but that is not good practice specially when we are using frameworks because frameworks are basically build for making our coding effort less and arrange file and folders in a better way.

With help of Services we can be able to access methods and properties across other components inside entire Application.

To create a Service we have to need to write simple command


ng g service service_name

Inside this case I have created two component i.e home and servicecheck and a service servicetest as shown inside image. Look at image carefully and we will find that after executing angular-cli command for creating services two files are automatically generated as in this case servicetest is name of service and two new files servicetest.service.spec.ts and servicetest.service.ts are generated as shown below inside application folder structure.

If we are beginner then in this phase we should not think more about servicetest.service.spec.ts  file because this is used during testing of application in this case we have to consider only about servicetest.service.ts which looks like


import { Injectable } from '@angular/core';

@Injectable({
  providedIn: 'root'
})
export class ServicetestService {

  constructor() { }
}

In this case Injectable module is imported from @angular/core. It contains @Injectable method and ServicetestService class. Now you can create properties or method that you want to access inside entire application.

Suppose we want to print date on my homepage then for this purpose we have to add

Before injecting service inside our application we have to need to include service inside app.moule.ts file and way to include service inside app.module.ts file is add inside provider array like.


import { BrowserModule } from '@angular/platform-browser';
import { NgModule } from '@angular/core';
import { AppComponent } from './app.component';
//import components 
import { HomeComponent } from './home/home.component';
import { ServicechekComponent } from './servicechek/servicechek.component';
//import service test
import { ServicetestService } from './servicetest.service';
//import Router Link
import {RouterModule,Router} from '@angular/router';

@NgModule({
  declarations: [
    AppComponent,
    HomeComponent,
    ServicechekComponent
  ],
  imports: [
    BrowserModule,
//RouterModule
    RouterModule.forRoot([
      {path:'home',component:HomeComponent},
      {path:'servicechek',component:ServicechekComponent}
    ])
    
  ],
  providers: [HomeComponent,ServicechekComponent],
  bootstrap: [AppComponent]
})
export class AppModule {

 }

In above code I think if you are absolutely new in Angular 4 then little bit confused in RouterModule code


RouterModule.forRoot([
      {path:'home',component:HomeComponent},
      {path:'servicechek',component:ServicechekComponent}
    ])

Router is basically used for navigation between pages in Angular if we talk in terms of background then it is navigation between one component to other component. We talk in details about Router in upcoming post. Don’t panic for that.

Now come to app.component.html file I have not removed previous content which is generate by Default.

<!--The content below is only a placeholder and can be replaced.-->
<div style="text-align:center">
  <h1>
    Welcome to {{ title }}!
  </h1>
  <img width="300" alt="Angular Logo" src="data:image/svg+xml;base64,PHN2ZyB4bWxucz0iaHR0cDovL3d3dy53My5vcmcvMjAwMC9zdmciIHZpZXdCb3g9IjAgMCAyNTAgMjUwIj4KICAgIDxwYXRoIGZpbGw9IiNERDAwMzEiIGQ9Ik0xMjUgMzBMMzEuOSA2My4ybDE0LjIgMTIzLjFMMTI1IDIzMGw3OC45LTQzLjcgMTQuMi0xMjMuMXoiIC8+CiAgICA8cGF0aCBmaWxsPSIjQzMwMDJGIiBkPSJNMTI1IDMwdjIyLjItLjFWMjMwbDc4LjktNDMuNyAxNC4yLTEyMy4xTDEyNSAzMHoiIC8+CiAgICA8cGF0aCAgZmlsbD0iI0ZGRkZGRiIgZD0iTTEyNSA1Mi4xTDY2LjggMTgyLjZoMjEuN2wxMS43LTI5LjJoNDkuNGwxMS43IDI5LjJIMTgzTDEyNSA1Mi4xem0xNyA4My4zaC0zNGwxNy00MC45IDE3IDQwLjl6IiAvPgogIDwvc3ZnPg==">
</div>
<h2>Here are some links to help you start: </h2>
<ul>
  <li>
    <h2><a target="_blank" rel="noopener" href="https://angular.io/tutorial">Tour of Heroes</a></h2>
  </li>
  <li>
    <h2><a target="_blank" rel="noopener" href="https://github.com/angular/angular-cli/wiki">CLI Documentation</a></h2>
  </li>
  <li>
    <h2><a target="_blank" rel="noopener" href="https://blog.angular.io/">Angular blog</a></h2>
  </li>
</ ul >

Now we make some changes for navigating from one page to another page and for that we will make some changes inside our app.component.html file.


<!--The content below is only a placeholder and can be replaced.-->
<div style="text-align:center">
  <h1>
    Welcome to {{ title }}!
  </h1>
  <img width="300" alt="Angular Logo" src="data:image/svg+xml;base64,PHN2ZyB4bWxucz0iaHR0cDovL3d3dy53My5vcmcvMjAwMC9zdmciIHZpZXdCb3g9IjAgMCAyNTAgMjUwIj4KICAgIDxwYXRoIGZpbGw9IiNERDAwMzEiIGQ9Ik0xMjUgMzBMMzEuOSA2My4ybDE0LjIgMTIzLjFMMTI1IDIzMGw3OC45LTQzLjcgMTQuMi0xMjMuMXoiIC8+CiAgICA8cGF0aCBmaWxsPSIjQzMwMDJGIiBkPSJNMTI1IDMwdjIyLjItLjFWMjMwbDc4LjktNDMuNyAxNC4yLTEyMy4xTDEyNSAzMHoiIC8+CiAgICA8cGF0aCAgZmlsbD0iI0ZGRkZGRiIgZD0iTTEyNSA1Mi4xTDY2LjggMTgyLjZoMjEuN2wxMS43LTI5LjJoNDkuNGwxMS43IDI5LjJIMTgzTDEyNSA1Mi4xem0xNyA4My4zaC0zNGwxNy00MC45IDE3IDQwLjl6IiAvPgogIDwvc3ZnPg==">
</div>
<h2>Here are some links to help you start: </h2>
<ul>
  <li>
    <h2>
      <a target="_blank" rel="noopener" href="https://angular.io/tutorial">Tour of Heroes</a>
    </h2>
  </li>
  <li>
    <h2>
      <a target="_blank" rel="noopener" href="https://github.com/angular/angular-cli/wiki">CLI Documentation</a>
    </h2>
  </li>
  <li>
    <h2>
      <a target="_blank" rel="noopener" href="https://blog.angular.io/">Angular Blog</a>
    </h2>
  </li>
  <li>
    <a [routerLink]="['/home']">Home</a>
  </li>
  <li>
    <a [routerLink]="['/servicechek']">Service Check</a>
  </li>
  <li>
    <a [routerLink]="['/']">Back</a>
  </li>
</ul>
<router-outlet></router-outlet>
<!-- Routed components go here -->

It’s time to make changes inside service class for final out


import { Injectable } from '@angular/core';

@Injectable({
  providedIn: 'root'
})
export class ServicetestService {
  constructor() { }
//create a method for finding date
  public getDate() {
    let date = new Date();
    console.log(date);
    return date;
  }
}

How to include Service inside Component?

For including service inside Component we have to make such changes inside component, we have to make changes inside component.html and component.ts file.As we have already generated two components first one is home component and second one is servicecheck component.

Home Component

  • home.component.html
  • home.component.ts

home.component.ts


import { Component, OnInit } from '@angular/core';
import { ServicetestService } from '../servicetest.service';
// import {ServicetestService} from ''

@Component({
  selector: 'app-home',
  templateUrl: './home.component.html',
  styleUrls: ['./home.component.css']
})
export class HomeComponent implements OnInit {
 public todate;
  constructor(public servicech:ServicetestService) { 
    console.log("constructor is called ...");

  }
  //ngOnInit method calls at first 
  ngOnInit() {  
    console.log("Ng OnInit method is called .....");
    this.todate=this.servicech.getDate();
  }

}

home.component.html


<p>
 Today is : {{todate |date}}
</p>

It is our root page

root-page

Now click on home tab as highlighted inside image and we will find our desired output as shown below.

home-service-page


Angular 4 Component Tutorial

In Angular major part of development has been done inside Component. We can also say that Components are basically backbone of Angular. Component provides flexibility to move from one view to another. In Angular best part is to load specific portion of page rather than loading complete page. As we know that (if u familiar little bit about how to start Angular then) after executing ng new Project_name we obtain file structure of app component which contains following files

Angular 4 component

  • app.component.css
  • app.component.html
  • app.component.spec.ts
  • app.component.ts
  • app.module.ts

If you open app.module.ts file then it contains @NgModule field and for being a part of complete application we have to list it inside the declaration filed  of @NgModule metadata.


import { BrowserModule } from '@angular/platform-browser';
import { NgModule } from '@angular/core';
import { AppComponent } from './app.component';
@NgModule({
   declarations: [
      AppComponent
   ],
   imports: [
      BrowserModule
   ],
  providers: [],
   bootstrap: [AppComponent]
})
export class AppModule { }

Currently Declaration filed contains AppComponent which is parent component of Application, which is generated by default.Now if You  want to create our own component then you have to run following angular-cli command.

ng g component component_name

After executing this command your new component will be automatically created suppose if  you execute Angular-cli command like ng g component new-comp then after executing this command you will obtain a folder new-comp inside directory which contains app.module.ts and other files and folder contains these files

    • new-cmp.component.css − css file for the new component is created.
    • new-cmp.component.html − html file is created.
    • new-cmp.component.spec.ts − this can be used for unit testing.
    • new-cmp.component.ts − here,you can define the module, properties etc , how new-comp component will be behave with application that definition resides inside new-cmp.component.ts file.

After executing Angular-cli command changes are added inside app.module.ts file as shown below


import { BrowserModule } from '@angular/platform-browser';
import { NgModule } from '@angular/core';
import { AppComponent } from './app.component';
import { NewCmpComponent } from './new-cmp/new-cmp.component';
// includes the new-cmp component we created
@NgModule({
   declarations: [
      AppComponent,
      NewCmpComponent // here it is added in declarations and will behave as a child component
   ],
   imports: [
      BrowserModule
   ],
   providers: [],
   bootstrap: [AppComponent] //for bootstrap the AppComponent the main app component is given.
})

export class AppModule { }

Default new-comp.component.ts file looks like this way


import { Component, OnInit } from '@angular/core'; // here angular/core is imported .
@Component({
   // this is a declarator which starts with @ sign. The component word marked in bold needs to be the same.
   selector: 'app-new-cmp', //
   templateUrl: './new-cmp.component.html', 
   // reference to the html file created in the new component.
   styleUrls: ['./new-cmp.component.css'] // reference to the style file.
})
export class NewCmpComponent implements OnInit {
   constructor() { }
   ngOnInit() {}
}

File contains a new class named NewCmpComponent that implements OnInit and containing constructor and method ngOnInit which is called at time of execution of class.

Now I think you are exited for watching what the magic  is happened after making these changes so for watching changes you have to execute magical Angular-cli command ng serve and after executing command your browser display localhost:4200 page  and you will find that oh no! nothing has been changed after doing so much changes. Don’t worry I am here, you have to make some more changes for obtaining your desired output.so, why you are waiting let’s do with me. open your index.html file residing inside src folder open this file and you will obtain some codes like


<html lang = "en">
   <head>
      <meta charset = "utf-8">
      <title>Angular 4App</title>
      <base href = "/">
      <meta name="viewport" content="width = device-width, initial-scale = 1">
      <link rel = "icon" type = "image/x-icon" href = "favicon.ico">
   </head>
   
   <body>
    <!-- Body Contains app app-root which is selectro of root component-->
      <app-root></app-root>
   </body>
</html>

As we have seen index.html body tag contains <app-root></app-root> tag which shows decides which component will be displayed on the browser.If you replaced it with


<app-new-cmp></app-new-cmp>

After that our code will look like


<html lang = "en">
   <head>
      <meta charset = "utf-8">
      <title>Angular 4App</title>
      <base href = "/">
      <meta name="viewport" content="width = device-width, initial-scale = 1">
      <link rel = "icon" type = "image/x-icon" href = "favicon.ico">
   </head>
   
   <body>
      <app-new-cmp></app-new-cmp>
   </body>
</html>

then You will obtained your desired outPut.

Note :

  1. app.component.html file is known as cell page
  2. new generated component pages are known as variable page.
  3. After executing ng new project_name we obtain parent component
  4. After executing ng g component componet_name we obtain child component