Connect Java with Sqlite3

Here we have explained an example in which we have to introduced concept of Java with Sqlite3 we discussed here concept behind establishing a connection with Java and sqlite3 database then perform operation of Create,Insert,Select Operation Reason behind switching to sqlite3 because sqlite3 is portable due to its smaller size and which suitable for any desktop application inside which we have to need smaller database, and good thing is that we don’t need to need to install any setup but also we have to store a .dll file and a shell file from specified location and take both files inside a single folder.

Download latest version SQLITE JDBC Driver from:   click here

Squlite-JDBC-Connection


//Import JDBC Packages
import java.sql.*;
import java.util.*;
public class SQLiteJDBC {
 public static void main(String args[]) {
  Connection con = null;
  Statement stmt = null;
  ResultSet rs = null;
  try {
   //Register JDBC Driver
   Class.forName("org.sqlite.JDBC");
   con = DriverManager.getConnection("jdbc:sqlite:D:/SQLiteOperation/main.db");
   // Location of SQLITE folder & main.db is default databse in SQLITE3 in your case you ca change it
   int choice;
   Scanner sb = new Scanner(System.in);
   System.out.println("Press 1 for Create table :");
   System.out.println("Press 2 for Insert Info :");
   System.out.println("Press 3 for Select Info :");
   choice = sb.nextInt();
   switch (choice) {
    case 1:

     // Creating Statement Object

     stmt = con.createStatement();
     String sqlString = "Create table test_table(name text,roll_no text)";
     stmt.executeUpdate(sqlString);
     stmt.close();
     con.close();
     break;
    case 2:

     // Creating Statement Object

     stmt = con.createStatement();
     stmt.executeUpdate("Insert into test_table(name,roll_no) values('Mohit','26')");
     stmt.close();
     con.close();
     break;
    case 3:

     // Creating Statement Object

     stmt = c.createStatement();
     rs = stmt.executeQuery("Select * from test_table");
     while (rs.next()) {
      String name = rs.getString("name");
      String roll_no = rs.getString("roll_no");
      System.out.println("name :" + name + "\nroll_no" + roll_no);
     }
     //statement close
     stmt.close();
     //connection close
     con.close();
     break;
   }
  } catch (Exception e) {
   System.err.println(e.getClass().getName() + ": " + e.getMessage());
   System.exit(0);
  }
  System.out.println("Opened database successfully");
 }
}

PHP webservices advance level

Hi Guys,

It is our advance and final level of php webservices in this session we will learn about

  1. Form Introduction
  2. Connectivity with php admin using php.
  3. Insertion operation with php
  4. Selection Opertaion with php
  5. Insert Operation with form action using php
  6. Display data on page

So, now we are starting without wasting our time

Form Introduction

What is the Form?

A Document that containing black fields, that the user can fill the data or user can select the data. Casually the data will store in the data base.

Example:

Below example shows the form with some specific actions by using post method. In this example I am adding two numbers taken from user from Input box and after clicking on submit button it will be displayed into paragraph tag.


<html>
 <head> </head> 
<body> 
<h2>Adding two numbers Using Form Action </h2> 

<form method="post"> 

<label>Enter Your first number :: </label> 
<input type="number" name="num1" /> 

<label>Enter Your Second number ::</label> 

<input type="number" name="num2" /><br> 

<input type="submit" name="submit" value="add two numbers" /> 

</form>

 <?php if(isset($_POST['submit'])){

 $number1=$_POST['num1']; 

$number2=$_POST['num2']; 

$sum=$number1+$number2; 

echo "<h2>Number after Addition" .$sum. "</h2>"; } 

?> 

</body>

</html>
        

Assignment 

# Enter Your First name inside input text enter your last name and print inside paragraph.

Connectivity with php admin using php

In php database connectivity is very simple go through these few lines of code


<?php 

$servername = "localhost";

$username = "root"; //your user name for php my admin if in local most probaly it will be "root"

$password = "root"; //password probably it will be empty or root 

$databasename = "soha_org"; //Your db nane // Create connection 

$conn = new mysqli($servername, $username, 

$password,$databasename); // Check connection 

if ($conn->connect_error) { 

die("Connection failed: " . $conn->connect_error); } 

echo "Connected successfully"; 

?>
        

Note : object operator, -> , is used in object scope to access methods and properties of an object. It’s meaning is to say that what is on the right of the operator is a member of the object instantiated into the variable on the left side of the operator.

Insertion operation with php

Now, we have learnt connectivity with phpadmin now we learnt about insertion Operation using php.


<?php

$servername="localhost";//servername here it is localhost 

$username="root"; //username 

$password="root"; //password

$dbane="soha_org"; //databasename //

Create a connection $conn=new mysqli($servername,$username,$password,$dbane); 

if($conn -> connect_error)

{ die("connection failed ".$conn ->connect_error); } 

//Insert query 

$sql ="Insert into student_info(name,email,gender,contact_num,additional,comment) values('abc','abc@gmail.com','Male','12345','nothing','something')";

if ($conn->query($sql) === TRUE) { 

echo "New record created successfully"; }

else{ echo "Something going wrong"; }

 ?>
        

After running this code just go to your php admin panel and you will find that yeah your data has been inserted inside your database table.


<?php //Here we are dealing with selection operation using php 

//At first we establish a database connection 

$servername="localhost";//servername

$username="root";//usernaame

$password="root"; //password 

$dbname="soha_org";//database name 

//Establish connection 

$conn = new mysqli($servername,$username,$password,$dbname); 

if($conn ->connect_error){ 

echo "Something is going wrong"; } 

//Select query to fetch your data

$sql="Select * From student_info"; 

$result =$conn->query($sql); 

if($result->num_rows > 0){ 

while($row=$result -> fetch_assoc()){ 

//Show your data taken from database table 

echo "id: " . $row["name"]. " - Email: " . $row["email"]. " " . "-Gender :" .$row["gender"]." " . "-contact number :: " .$row["contact_num"]. " " . "-Additional ::" .$row["additional"]. " " ."-comment :: " .$row["comment"]. "<br>"; } }else{ echo "0 results"; 

}

$conn->close(); 

?>


PHP webservices level 0

In this session I will describe about some basic concepts of php i.e.

  • What is PHP ?
  • PHP Features
  • How to Install PHP?
  • How to start WAMP Server?
  • Some key Concepts of WAMP server page
  • PHP Syntax

What is PHP?

  • PHP stands for HyperText Preprocessor.
  • PHP is an interpreted language, i.e. there is no need for compilation.
  • PHP is a server side scripting language.
  • PHP is faster than other scripting language e.g. asp and jsp.
  • PHP is a server side scripting language.
  • PHP is an object-oriented language.
  • PHP is an open-source scripting language.
  • PHP is simple and easy to learn language.

PHP Features

There are given many features of PHP.

    • Performance: Script written in PHP executes much faster then those scripts written in other languages such as JSP & ASP.
    • Open Source Software: PHP source code is free available on the web, you can developed all the version of PHP according to your requirement without paying any cost.
    • Platform Independent: PHP are available for WINDOWS, MAC, LINUX & UNIX operating system. A PHP application developed in one OS can be easily executed in other OS also.
    • Compatibility: PHP is compatible with almost all local servers used today like Apache, IIS etc.
    • Embedded: PHP code can be easily embedded within HTML tags and script.

How to Install PHP?

To run php program out system have need Apache,Mysql,PHP software stack, and There are many options available in the market from which we can be able to full fill our requirement.
Some of AMP options and their Download link.

    WAMP for Windows

  • LAMP for Linux
  • MAMP for Mac
  • SAMP for Solaris
  • FAMP for FreeBSD
  • XAMPP (Cross, Apache, MySQL, PHP, Perl) for Cross Platform: It includes some other components too such as FileZilla, OpenSSL, Webalizer, Mercury Mail etc.

If you are windows user and don’t want Perl and other features of XAMPP, you should go for WAMP. In a similar way, you may use LAMP for Linux and MAMP for Macintosh.

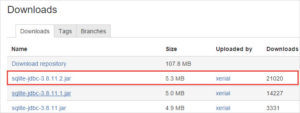
Download and Install WAMP Server

Click me to download WAMP server

Download and Install LAMP Server

Click me to download LAMP server

Download and Install MAMP Server

Click me to download MAMP server

Download and Install XAMPP Server

Click me to download XAMPP server

After installing these (not all) one of them you can be able to obtain your AMP packages that u have to need for running Your php Program.

Here ,I am using WAMP server for these complete session so, u have need to install WAMP server for practice from your own side.

How to start WAMP Server?

After installing WAMP server You have need to know how to start WAMP server but Don’t worry I am not using any rocket science here for starting Your WAMP sever. You have need to just follow these steps.

  • Just press Your windows key
  • Then serach for WAMP
  • Click on installer
  • Press yes now Your server is start.
  • Now type localhost in Your url and press Enter.

If everything is fine then on brower page You will get

wamp server page

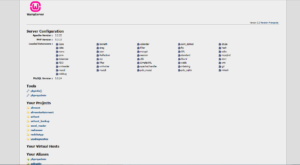
Some key Points of WAMP server page

Inside Tools section you will find

  • phpinfo : you will get information about PHP go through it and just check.
  • phpadmin : here You can create Your database and maintain Your details from here.

I will show You how to create a database and maintain tables inside phpaddmin at a glance.

After that Your local host page contains Your project title tag which contains Your project list if You have done as in my case aliveent,aliveentertainment,arihant,arihant_backup,excel_reader,mahaveer,yesdiagnostics .

project list

Just click on any one of them and your project  will be open inside Your browser.

PHP syntax

To write PHP syntax is not a tough task. It is very easy to write a simple PHP example. To do so, create a file and write HTML tags + PHP code and save this file with .php extension.
All PHP code goes between php tag.
A syntax of PHP tag is given below:


        <?php //your code here ?>

You are free to write PHP script anywhere the page but better to prefer to write it inside body tag.

If you will understand from above line what do I want to say then good if not then very good because I am explaining it with example.

Suppose You want to declare a int type variable then just write


    $x=5;    

Now , from above line you have declared a integer type of variable which contains value 5.

I know you want to execute it and it is also good habit of a programmer to write code and execute from its own end. Then open your editor and type complete code.


<html>

<head> </head> 

    <body> 

    <?php $x =5; echo "It is an integer type value $x"; ?> 

   </body>

</html>

From above example we understood that in php there is need of declaring variable with their respective data type.

Similarly, In second example we explain how to declare string :


<html> 

<head> </head> 

  <body> 
    <?php $name ="Dheeraj"; echo "hey! I am $name"; ?>
 </body>

 </html>

Some more Examples to clear your concept :

Adding two numbers :


<html> 
<head> </head> 

  <body> 
  <?php 
  //First of all decalre two variables 

   $a=5; 

   $b=6; 

   $c=$a+$b; 

   echo "value of a : $a <br>"; 

   echo "value of b : $b <br>"; 

   echo "After adding two numbers output will be : $c"; ?> 

   </body> 
</html>
        

Displaying messages inside html tags using php

In real time applications we have to need to displaying messages inside html tags like (h1,h2,h3 …h7,p etc), from next example I will explain how to display a message inside html tag.


<html> 
<head> </head> 

 <body>

 <h1>Profile details </h1> 

<?php //At first decalring variables

$name="abc"; 

$emailId="abc@gmail.com";

$contact="91XXXXXX21"; 

$additional="php"; //Displaying messages 

echo "<h3> hey I am " .$name. "</h3><br>"; 

echo "<h6>My emailId is ".$emailId. "</h6><br>"; 

echo "<h6>My contact number is ".$contact."</h6></br>"; 

echo "<p>I like to learn more about web techonolgy so,".$additional. " is one of my favourite language.<p>" ?> 

</body> 

</html>
        

Note : Don’t  confused with dot (‘.’) inside variable  .$name.,.$emailId.,.$contact.,.$additional. It is simply separator operator used for separating two messages also used for concatenating two messages.