Structural design patterns are used to solve problems related to the composition of objects and their relationships. They help to organize code into larger structures, making it easier to maintain and modify.
Concerned with how objects are made up and simplify relationships between objects.
The four most common structural design patterns in JavaScript are:
Adapter Pattern: The Adapter pattern allows objects with incompatible interfaces to work together. It acts as a bridge between two incompatible interfaces, making them compatible.
Decorator Pattern: The Decorator pattern adds functionality to an object dynamically without changing its original structure. It is used to extend the functionality of an object at runtime.
Facade Pattern: The Facade pattern provides a simplified interface to a complex system. It acts as a high-level interface that makes it easier to use a complex system by providing a simplified interface to it.
Flyweight Pattern: The Flyweight Pattern is useful when an application needs to create a large number of similar objects that differ only in some small aspects. By sharing the common properties, it reduces the memory footprint of an application and improves performance.
Adapter Pattern
The Adapter Pattern is a structural design pattern that allows objects with incompatible interfaces to work together by creating an adapter that acts as an intermediary between the two objects. The adapter translates the interface of one object into an interface that the other object can understand.
Adapter Pattern introduces an intermediary piece of code that makes two parts of a system compatible with one another.
Let’s say we have an existing class that provides a certain interface, but we want to use that class in a new context where it needs to conform to a different interface. We can use the Adapter Pattern to create a new class that adapts the existing class to the new interface.
Now understand Adapter Pattern with an example and here we are going to explain an example in steps:
As a JavaScript developer, you know that creating and managing objects can be a challenging task, especially as your projects grow in complexity. That’s where creational design patterns come in – they provide a proven blueprint for object creation that can help you write more efficient, scalable, and maintainable code.
In this blog post, we’ll explore the world of creational design patterns in JavaScript and discover how they can help us build better objects. We’ll start by introducing the basics of creational design patterns, discussing their advantages and disadvantages, and exploring some common patterns like the factory pattern, the builder pattern, and the singleton pattern.
By the end of this post, we’ll have a solid understanding of how to use creational design patterns to create more flexible and reusable objects, improve the performance and reliability of our code, and take our JavaScript skills to the next level. So, let’s get started!
In this post, we are going to start with Factory Pattern then after we will cover other patterns one by one :
Factory Pattern
The Factory Pattern is a creational design pattern that provides an interface for creating objects but allows subclasses to alter the type of objects that will be created. This pattern is often used when you need to create a large number of similar objects, or when the process of creating an object is complex and involves a lot of boilerplate code.
Factory Pattern is used to simplify Object Creation.
In JavaScript, the Factory Pattern is typically implemented using a factory function, which is a function that returns an object. The factory function can take arguments and use them to customize the object that it creates.
How to Create Factory Pattern in Javascript?
To Create a Factory Pattern in Javascript we need to follow the following steps:
Step 1: Creating a Factory Function
To create a factory function, we’ll need to define a function that returns an object.
In this example, the createCar function takes three arguments: make, model, and year. It then returns an object that has properties for make, model, and year, as well as a drive method that logs a message to the console.
Step 2: Implementing the Factory Function
To use the factory function, we’ll need to call it and pass in any arguments that it requires.
In this example, we’re calling the createCar function twice, passing in different arguments each time. This will create two separate objects, one for a Honda Civic and one for a Toyota Corolla.
Step 3: Using the Factory Function
Once we’ve created the objects using the factory function, we can use them just like any other object in JavaScript.
Here’s an example:
  car1.drive(); // logs "Driving the Honda Civic..."
  car2.drive(); // logs "Driving the Toyota Corolla..."
In this example, we’re calling the drive method on each of the objects created by the factory function. This will log a message to the console indicating that we’re driving the corresponding car.
Pros and Cons of Factory Pattern in Javascript
Pros
Encapsulation: The Factory Pattern encapsulates object creation and allows you to create objects without exposing the creation logic. This helps to keep your code organized and easy to maintain.
Abstraction: The Factory Pattern provides an abstraction layer between the object creation and the client code, making it easy to change the object creation process without affecting the client code.
Flexibility: With the Factory Pattern, you can create objects dynamically at runtime, based on user input or other conditions. This makes it a flexible and versatile pattern for object creation.
Reusability: The Factory Pattern promotes code reusability by providing a centralized place for object creation logic. This reduces code duplication and makes it easier to maintain and modify the code.
Cons
Complexity: The Factory Pattern can add some complexity to your code, especially if you need to create many different types of objects. It can also be difficult to understand and implement for beginners.
Performance: The Factory Pattern can have a negative impact on performance if the factory function is called frequently or if the object creation process is resource-intensive.
Coupling: The Factory Pattern can create tight coupling between the factory and the created objects, which can make it difficult to change the object creation process later.
Singleton Pattern
The Singleton Pattern is a design pattern that restricts the instantiation of a class to a single instance and provides a global point of access to that instance. In JavaScript, you can implement the Singleton Pattern using a simple object literal or a constructor function.
Here’s an example of how to create a Singleton using an object literal:
  const singleton = {
    instance: null,
    getInstance: function() {
      if (!this.instance) {
        this.instance = {
          // properties and methods of your singleton object
        };
      }
      return this.instance;
    }
  };
In this example, we define a singleton object that has an instance property and a getInstance method. The getInstance method checks whether the instance property is null, and if so, it creates a new instance of the object. If the instance property is not null, it simply returns the existing instance.
To use the Singleton, you can call the getInstance method:
const mySingleton = singleton.getInstance();
This will either create a new instance of the object or return the existing instance, depending on whether an instance has already been created.
Here’s an example of how to create a Singleton using a constructor function:
  function MySingleton() {
    if (!MySingleton.instance) {
      MySingleton.instance = this;
      // properties and methods of your singleton object
    }
    return MySingleton.instance;
  }
In this example, we define a MySingleton constructor function that checks whether the instance property is null and creates a new instance of the object if it is. We also set the instance property to the current object using this, and return the instance.
To use the Singleton, you can create a new instance of the MySingleton constructor function:
const mySingleton = new MySingleton();
This will either create a new instance of the object or return the existing instance, depending on whether an instance has already been created.
The Singleton Pattern offers several advantages, including easy access to a single instance of an object, and control over the instantiation process. However, it can also have some drawbacks, such as tight coupling between the Singleton object and other parts of your code, and difficulty in unit testing. It’s important to weigh the pros and cons of using the Singleton Pattern in your specific use case and to use it judiciously.
Pros and Cons of Singleton Pattern in Javascript
Pros
Easy access to a single instance: The Singleton Pattern provides a global point of access to a single instance of an object, making it easy to access that object from anywhere in your code.
Control over the instantiation process: By restricting the instantiation of a class to a single instance, the Singleton Pattern gives you control over the creation of that object and ensures that only one instance is created.
Conserves resources: By limiting the number of instances of an object, the Singleton Pattern can help conserve resources in your application.
Provides a shared state: Because there is only one instance of the object, it can be used to maintain a shared state across your application.
Cons
Tight coupling: The Singleton Pattern can lead to tight coupling between the Singleton object and other parts of your code. This can make it difficult to change the behavior of your code without also changing the behavior of the Singleton object.
Hard to unit test: Because the Singleton object is global, it can be difficult to unit test your code in isolation. This can make it harder to catch bugs and maintain your code over time.
Can lead to code bloat: Because the Singleton object is global, it can be easy to add too many properties and methods to the object, leading to code bloat and decreased maintainability.
Can lead to unexpected behavior: Because there is only one instance of the object, any changes made to that object will be reflected across your application. This can lead to unexpected behavior and make it harder to reason about your code.
In TypeScript, classes are a way to define a blueprint for creating objects with specific properties and methods. To simplify it more we can say that classes are Template for creating Objects.
classes contains state in terms of variables and it also contains behavior in terms of methods.
Here is an example of a basic class in TypeScript:
  class Animal {
    name: string;
    sound:string;
    constructor(name: string,sound:string) {
      this.name = name;
      this.sound=sound;
    }
    makeSound() {
      console.log(`${this.name} makes a sound as ${this.sound}`);
    }
  }
In this example, we’ve created a class called Animal with a property called name, sound and a method called makeSound(). The constructor() method is called when an object of the Animal class is created, and it takes a name and sound parameter that is used to set the name and sound property of the object.
How to create an Instance of class?
To create an instance of the Animal class, we can use the new keyword:
  let myAnimal = new Animal('lion','roar');
  console.log(myAnimal.name); // Output: 'lion'
  myAnimal.makeSound();  // Output: 'lion makes a sound as roar'
Class Constructors in Typescript
In TypeScript, a class constructor is a special method that is executed when an instance of the class is created. The constructor method is defined using the keyword constructor.
Here I am taking same example as mentioned above trying to explain in more deeply.
  class Animal {
    name: string;
    sound:string;
    constructor(name: string,sound:string) {
      this.name = name;
      this.sound=sound;
    }
    makeSound() {
      console.log(`${this.name} makes a sound as ${this.sound}`);
    }
  }
  let myAnimal = new Animal('lion','roar');
  console.log(myAnimal.name); // Output: 'lion'
  myAnimal.makeSound();  // Output: 'lion makes a sound as roar'
In this example, the Animal class has a constructor that takes in two arguments: name and sound. When a new instance of the Animal class is created using the new keyword, the constructor is automatically called with the provided arguments.
Inside the constructor, the name and sound properties of the instance are set using the this keyword.
The makesound method is defined on the Animal class and can be called on any instance of the class, including myAnimal. When the makeSound method is called on myAnimal, it logs a message to the console using the name and sound properties of the instance.
Optional Parameter in Constructor
In TypeScript, we can make constructor parameters optional by adding a ? symbol after the parameter name. This indicates that the parameter is optional and doesn’t need to be provided when creating an instance of the class.
  class Person {
    name: string;
    age?: number;

    constructor(name: string, age?: number) {
      this.name = name;
      this.age = age;
    }

    greet() {
      if (this.age) {
        console.log(`Hello, my name is ${this.name} and I'm ${this.age} years old.`);
      } else {
        console.log(`Hello, my name is ${this.name}.`);
      }
    }
  }

  const john = new Person('John');
  john.greet(); // OutPut: "Hello, my name is John."

  const jane = new Person('Jane', 25);
  jane.greet(); // OutPut: "Hello, my name is Jane and I'm 25 years old."
In this example, the Person class has an optional age parameter in its constructor. When creating a new instance of the Person class, the age parameter can be provided or omitted. If the age parameter is provided, it is stored in the age property of the instance. If the age parameter is omitted, the age property will be undefined.
In the greet method, an if statement is used to determine whether the age property is defined. If the age property is defined, a message is logged to the console that includes the name and age properties. If the age property is undefined, a different message is logged that only includes the name property.
Class Expression in Typescript
In TypeScript, a class expression is a way to define a class as a value, just like a function expression defines a function as a value.
A class expression can be used anywhere a value of its type is expected, including as a function argument or as a property of an object.
Here is an example of a class expression in TypeScript:
In this example, ClassExpression is a constant that holds a class expression. The class has a private property x and a constructor that takes a number argument and sets the x property. The class also has a method getX that returns the value of x.
We can create an instance of the class expression just like we would with a regular class:
  const instance = new ClassExpression(42);
  console.log(instance.getX()); // prints 42
In this example, NamedExpressionClass is the variable that holds the class expression, and MyClass is the name of the class that can be used inside the class body. Named class expressions can be useful for debugging or for creating self-referential classes.
Class Inheritance in Typescript
Class inheritance is a powerful feature in object-oriented programming that allows us to define a new class based on an existing class.
In Typescript, class inheritance is supported through the “extends” keyword.
How to Extends class in Typescript?
In Typescript We can also extend a class to create a new class that inherits the properties and methods of the original class. Means to they will contain all methods and properties of their Parent class.
  class Animal {
    name: string;
    sound:string;
    constructor(name: string,sound:string) {
      this.name = name;
      this.sound=sound;
    }
    makeSound() {
      console.log(`${this.name} makes a sound as ${this.sound}`);
    }
  }
  const Cat=class extends Animal {
    constructor(name: string,sound:string) {
      super(name,sound);
    }
    makeSound() {
      console.log(`The cat ${this.sound}`);
    }
    purr() {
      console.log('The cat purrs.');
    }
  }

  let myCat = new Cat('Fluffy','meows');
  console.log(myCat.name); // Output: 'Fluffy'
  myCat.makeSound(); // Output: 'The cat meows.'
  myCat.purr(); // Output: 'The cat purrs.'
In this example, we’ve created a Cat class that extends the Animal class. The Cat class has its own makeSound() method that overrides the makeSound() method of the Animal class. It also has a new method called purr(). When we create an instance of the Cat class, it has access to both the makeSound() method from the Animal class and the purr() method from the Cat class.
  abstract class Animal {
    constructor(public name: string) {}

    abstract makeSound(): void;

    move(distance: number) {
      console.log(`${this.name} moved ${distance} meters.`);
    }
  }

  class Dog extends Animal {
    constructor(name: string) {
      super(name);
    }

    makeSound() {
      console.log("Woof! Woof!");
    }
  }

  const dog = new Dog("Buddy");
  dog.move(10);       // Output: "Buddy moved 10 meters."
  dog.makeSound();    // Output: "Woof! Woof!"
In this example, we have an abstract class called Animal which has a constructor that takes in a name parameter, a method called move that logs how far the animal moved, and an abstract method called makeSound. The makeSound method is declared with the abstract keyword, which means that any subclass of Animal must provide an implementation for this method.
We then create a subclass called Dog which extends Animal and provides an implementation for the makeSound method. We also call the constructor of the parent class using the super keyword.
When we create a new instance of Dog, we pass in the name “Buddy” to the constructor. We can then call both the move and makeSound methods on the dog object.
By using an abstract class, we can define a common interface for a group of related classes (in this case, animals). We can also ensure that any subclass of Animal provides an implementation for the makeSound method.
Abstract Class in Typescript
An abstract class in TypeScript is a class that cannot be directly instantiated but can only be used as a base class for other classes. Abstract classes are defined using the abstract keyword and they provide a way to define a common interface for a group of related classes.
Here’s an example of an abstract class in TypeScript:
  abstract class Animal {
    constructor(public name: string) {}

    abstract makeSound(): void;

    move(distance: number) {
      console.log(`${this.name} moved ${distance} meters.`);
    }
  }

  class Dog extends Animal {
    constructor(name: string) {
      super(name);
    }

    makeSound() {
      console.log("Woof! Woof!");
    }
  }

  const dog = new Dog("Buddy");
  dog.move(10);       // Output: "Buddy moved 10 meters."
  dog.makeSound();    // Output: "Woof! Woof!"
In this example, we have an abstract class called Animal which has a constructor that takes in a name parameter, a method called move that logs how far the animal moved, and an abstract method called makeSound. The makeSound method is declared with the abstract keyword, which means that any subclass of Animal must provide an implementation for this method.
We then create a subclass called Dog which extends Animal and provides an implementation for the makeSound method. We also call the constructor of the parent class using the super keyword.
When we create a new instance of Dog, we pass in the name “Buddy” to the constructor. We can then call both the move and makeSound methods on the dog object.
By using an abstract class, we can define a common interface for a group of related classes (in this case, animals).
Note: We have to also ensure that any subclass of Animal provides should contain an implementation for the makeSound method because it is an Abstract method.
Interfaces in TypeScript are a way to define contracts for variables, objects, and functions. They specify what properties and methods an object should have, without specifying the implementation details.
Here’s an example of how you can define an interface in TypeScript:
We can then use this interface to create objects that must adhere to the specified properties and methods:
     const person: Person = {
      name: "John Doe",
      age: 30,
      sayHello: () => console.log(`Hello, my name is ${person.name}`)
    };

    person.sayHello(); // Output: Hello, my name is John Doe
Interfaces for Class in Typescript
Interfaces in TypeScript can also be used with class types, allowing us to enforce a specific structure for classes:
  interface User {
    username: string;
    password: string;
  }

  class Employee implements User {
    constructor(public username: string, public password: string) {}
  }
  const user = new Employee("johndoe", "password123");
  console.log(user);


     //OutPut: Employee: {"username": "johndoe", "password": "password123"}
Interfaces provide a way to define reusable contracts that can be implemented by multiple types, making it easier to ensure that objects in your code are properly structured and adhere to a common set of rules.
Duck Typing in Typescript
Duck typing is a concept in dynamic programming languages, including TypeScript, where the type of an object is determined by its structure and behavior, rather than its class or interface.
In TypeScript, you can use the “typeof” operator to determine the type of an object at runtime, and to check if it has the required properties and methods.
For example:
  let someObject = { name: "John Doe", age: 30 };

  if (typeof someObject === "object" && "name" in someObject && "age" in someObject) {
    console.log(`The object has a name property: ${someObject.name}`);
  }

   //OutPut: The object has a name property: John Doe
This allows us to write code that is more flexible and can work with objects of different types, as long as they have the required properties and methods.
Note that while duck typing is a useful concept in dynamic programming languages, it can also make it more difficult to catch type-related errors at compile time.
To balance the benefits and drawbacks of duck typing, TypeScript provides static typing and type inference, which can catch type-related errors before your code runs, while still allowing you to take advantage of the benefits of duck typing when necessary.
Interfaces for function types in Typescript
In TypeScript, you can use interfaces to define the structure of functions. This allows you to specify the number of parameters, their types, and the return type of a function.
Here’s an example of how you can define an interface for a function type:
We can use this interface to ensure that any function assigned to the add variable must have the specified structure and behavior. This makes it easier to enforce a consistent contract for functions in our code, and can help catch errors before our code runs.
Function interfaces can also be used in conjunction with other types, such as classes and objects, to specify the expected behavior of functions that are used as properties or methods of these types.
For example, we can use a function interface to specify the type of a callback function that is passed as an argument to another function:
Function interfaces in TypeScript provide a powerful way to enforce a consistent contract for functions, making it easier to write maintainable and robust code.
Extending Interfaces in Typescript
In TypeScript, you can extend an interface by using the “extends” keyword. This allows you to inherit the members of an existing interface into a new interface.
In this example, the “Developer” interface extends the “Person” interface and adds an additional “skills” property. A value of the “Developer” type must have all the properties of both “Person” and “Developer”.
Here we are going to describe about Functions in Typescript and better way to understand concept after making comparison with JavaScript Function.
In TypeScript, functions are similar to those in JavaScript with a some additional features. TypeScript adds type annotations to functions to specify the types of input arguments and the return type. This provides type checking at compile time and can help us to prevent runtime errors.
For example:
  function addTwoNumbers(a: number, b: number): number {
    return a + b;
  }
Another feature of TypeScript functions is the use of optional and default parameters.
In TypeScript, we can specify optional parameters by adding a ? after the parameter name, and default parameters can be specified by adding an = followed by the default value.
In JavaScript, functions are defined using the function keyword, followed by the function name, a list of parameters in parentheses, and the function body in curly braces.
For example:
    /**
      sample code
     */

     function add(a, b) {
      return a + b;
    }
JavaScript and Typescript both also supports arrow functions (also known as “fat arrow” functions), which are a shorthand for defining anonymous functions.
For example:
     const add = (a, b) => a + b; // Javascript
     const add = (a:number,b:number):number => a+b; //Typescript
Both TypeScript and JavaScript support function overloading, where you can define multiple functions with the same name but different parameter lists.
However, in JavaScript, the implementation must check the number and types of arguments passed in at runtime and respond accordingly.
In TypeScript, the type checker will pick the correct implementation based on the types of the arguments passed in at compile time. Further We will discuss in more details about function overloading .
Arrow functions in Typescript
In TypeScript, arrow functions (also known as “fat arrow” functions) are a shorthand for defining anonymous functions. They have a more concise syntax compared to regular functions and also automatically bind the this value of the function to the value of the surrounding context.
Here is an example of an arrow function in TypeScript:
In this example, the arrow function addTwoNumbers takes two parameters num1 and num2 of type number, and returns the sum of num1 and num2 as a number.
Note: that if the arrow function only has a single expression, the return type can be inferred and the return keyword can be omitted:
const add = (a: number, b: number) => a + b;
Arrow functions are particularly useful when working with callback functions and when defining class methods. They can also be used as a more concise alternative to regular functions.
Function type in Typescript
In TypeScript, function types describe the signature of a function, including the parameters and return type.
In TypeScript, there are several ways that can be used to declare a function, including:
# Function type:
This type can be used to describe the signature of a function, including the parameters and return type. For example:
let add: (a: number, b: number) => number;
# Callback function type:
This type is used to describe a function that is passed as an argument to another function.
For example:
  function callBack(cb: (data: string) => void) {
    cb("Hello World");
    }
# Anonymous function type:
This type is used to describe an anonymous function, which is a function that is declared without a name.
In TypeScript, there are several ways to declare function parameters:
Required parameters: These are regular parameters that must be passed in when calling the function. They are declared by including the parameter name followed by its type in the function signature.
Optional parameters: These parameters can be omitted when calling the function. They are declared by adding a ? after the parameter name in the function signature.
Default parameters: These parameters have a default value that will be used if no value is passed in when calling the function. They are declared by using an = followed by the default value in the function signature.
Rest parameters: These allow you to represent an indefinite number of arguments as an array. They are declared using the syntax …parameterName: type[].
Object destructuring parameters: These allow you to extract values from objects and assign them to separate variables. They are declared using object destructuring syntax in the function signature.
Array destructuring parameters: These allow you to extract values from arrays and assign them to separate variables. They are declared using array destructuring syntax in the function signature.
Tuple parameters: These allow you to pass in a fixed number of arguments of different types. They are declared using a tuple type in the function signature.
In general, the combination of these different parameter types allows you to create flexible and reusable functions that can handle a wide range of inputs.
Although all ways for declaring parameters are important but above 4 ones are most important and commonly used in day to day life during writing code. So I like to discuss about these topics in more detail.
Optional and Default Parameters in Typescript
In TypeScript, optional parameters are defined by adding a “?” to the parameter name in a function declaration. These parameters can be omitted when calling the function, in which case their value will be undefined. Default parameters, on the other hand, allow you to set a default value for a parameter if no value is provided. This is done by using an “=” followed by the default value in the function declaration.
Here’s an example of using optional and default parameters in TypeScript:
  function greet(name: string, greeting?: string, message: string = "Good morning!") {
    if (greeting) {
      console.log(greeting + ", " + name + ". " + message);
    } else {
      console.log("Hello, " + name + ". " + message);
    }
  }

  greet("John");
  // Output: Hello, John. Good morning!

  greet("John", "Hi");
  // Output: Hi, John. Good morning!

  greet("John", "Hi", "How are you?");
  // Output: Hi, John. How are you?
In this example, the greetingparameter is optional, while the messageparameter has a default value of “Good morning!”. When calling the function, you can provide a value for both, either one, or neither.
Rest Parameters in Typescript
In TypeScript, rest parameters allow you to represent an indefinite number of arguments as an array. This is useful when you don’t know in advance how many arguments will be passed to a function.
The syntax for rest parameters is to use three dots (...) followed by the parameter name,
For example:
  function sum(...numbers: number[]) {
    let result = 0;
    for (const number of numbers) {
      result += number;
    }
    return result;
  }

  console.log(sum(2, 2, 3, 4, 4));

  // Output: 15
In this example, the sum function takes any number of arguments, collects them in an array numbers, and then adds them all up to find the sum.
Note that rest parameters must be the last parameter in a function signature. Additionally, you can only have one rest parameter per function.
Function Overloading in Typescript
In TypeScript, function overloading allows you to define multiple function signatures with the same name, but different parameters. The correct function to be called is determined based on the arguments passed in when the function is called.
Here’s an example of function overloading in TypeScript:
function combibne(a: number, b: number): number;
function combibne(a: string, b: string): string;
function combibne(a: any, b: any): any {
  return a + b;
}

const result1 = combibne(1, 2);
console.log(result1);
// Output: 3

const result2 = combibne("Hello, ", "world");
console.log(result2);
// Output: Hello, world
In this example, the combine function is overloaded to have two different signatures: one for adding numbers, and one for concatenating strings. The correct function is determined based on the types of the arguments passed in when the function is called.
Function overloading can be useful for creating functions that can handle a variety of inputs, but it’s important to note that JavaScript itself does not support function overloading.
The function overloading syntax in TypeScript is simply a way of providing type information for the function and is used to generate JavaScript code that implements the desired behavior.
TypeScript is a superset of JavaScript that adds optional static typing and other features to the language. It is designed to improve the development of large-scale JavaScript applications and make it easier to catch common errors before they reach production.
TypeScript code is transpiled to JavaScript, so it can be run in any browser or JavaScript environment.
Some of the key features of TypeScript include.
classes
Interfaces
type annotations
It also supports latest features of javascript like ES6, ES7, ES8 and so on. TypeScript can be integrated with various popular framework and libraries like Angular, React, Vue.js, etc.
How to make Setup for Typescript?
To install and set up TypeScript on your machine, we have to follow these steps:
Make sure Node.js and npm (Node Package Manager) has been installed on our machine. we can check if they are installed by running the commands node -v and npm -v in the terminal.
Open a terminal and run the command npm install -g typescript to install TypeScript globally on your machine.
Create a new directory for our project and navigate to it in the terminal.
Run the command npm init -y to create a package.json file in your project directory.
Run the command tsc --init to create a tsconfig.json file in your project directory. This file is used to configure the TypeScript compiler.
Open the tsconfig.json file and set the “target” property to “es6” or higher version, and also set the “outDir” property to “./dist” (or any other desired output directory).
Create a new file with the .ts extension in your project directory. For example, “main.ts”
We can now start writing TypeScript code in the main.ts file.
To compile the TypeScript code to JavaScript, run the command tsc in the terminal.
To run the compiled JavaScript code, we will need to have Node.js installed on our machine, then we can use the command node dist/main.js to run your code.
We could also use a build tool like webpack to bundle our application and handle the transpilation process to javascript and other development needs.
How to run typescript in Browser?
One way to do this is by transpiling the TypeScript code to JavaScript using a tool like the TypeScript compiler, and then including the transpiled JavaScript code in a script tag in an HTML file. The JavaScript code can then be executed by the browser. Another way is to use a transpiler like Babel to convert the TypeScript code to JavaScript before it is run by the browser.
For better Understanding we are going to explain it with an example
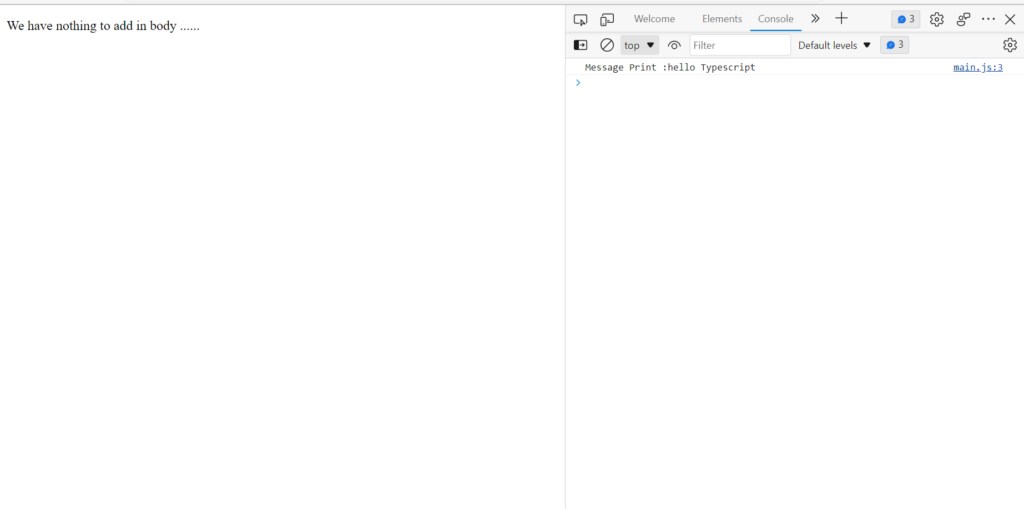
here is our typescript file main.ts and it basically prints a message. As shown below.
    /**
      sample code
     */

     let message:string="hello Typescript";

     console.log("Message Print :"+message);
for transpiling Typescript code into Javascript we are following above rule as defined in previous section. So, after making changes inside our tsc config file we need to execute below command in our terminal.
Now we need to create html file. Where we will add transpiled Javascript code in HTML script tag.
<!DOCTYPE html>
<html>
    <head>
        <script src="./dist/main.js"></script>
    </head>
    <body>
    <p>We have nothing to add in body ......</p>
    </body>
</html>
Now once will load this html file in our browser. then inside our browser console we can be able to check our output as shown below.
Is Typescript better than Javascript?
Whether TypeScript is better than JavaScript is a matter of personal preference and the specific use case. TypeScript provides certain features, such as optional static typing and class-based object-oriented programming, that can improve the development experience and catch certain types of errors before they reach production. This can make it a better choice for larger and more complex projects.
On the other hand, JavaScript is a more widely-used and well-established language, and it has a larger ecosystem of libraries and frameworks. It is also more versatile, as it can be used both on the front-end and back-end of web development.
In short, TypeScript can be a better choice for certain types of projects where the added features and type checking can improve the development experience, but JavaScript is still a widely used and versatile language that is suitable for a wide range of use cases.
Free Online Resources for learning Typescript
There are many online resources available to help us to get started with TypeScript. Here are a few popular ones:
The TypeScript website (typescriptlang.org) – This site provides official documentation and resources for learning TypeScript, including tutorials and guides for getting started.
These are just a few examples, there are a lot more resources available on the internet. The best way to learn is to try and build something with TypeScript and look for answers online when you are stuck.
In this tutorial I am going to explain about some core concepts of Typescript and trying to teach you in simpler way. So please be with me till the end of this tutorial.
Here I am going to explain you about Object Types and Union Types
In the beginning we will go with Object Types and then after we will cover Union Types. Keep in mind both are important topics. So please focus till the end.
Object Type
To Define an Object, we need to define its properties and their types. So, Suppose Person is an object and Person contains its properties like name, age, salary.
That we can write like this
    /**
      Object example
     */

    let Person:{
    name:string,
    age:number,
    salary:number,
 }={
    name:"Dheeraj",
    age:28,
    salary:5000
 }
Then to define person object we need focus on each property of person and define their types as we have done previously.
Note: If we missed to define type of the property then by default it will take any type to that property.
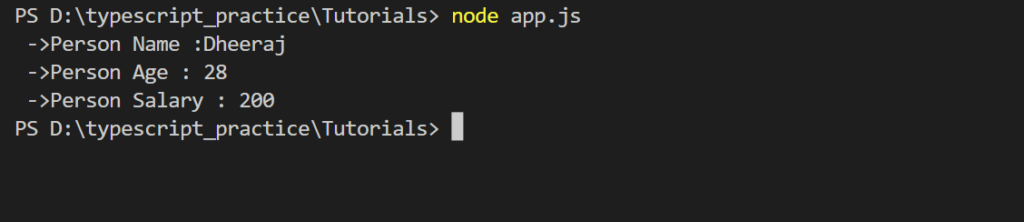
For its Better understanding we are going to create a function and pass object as parameter.
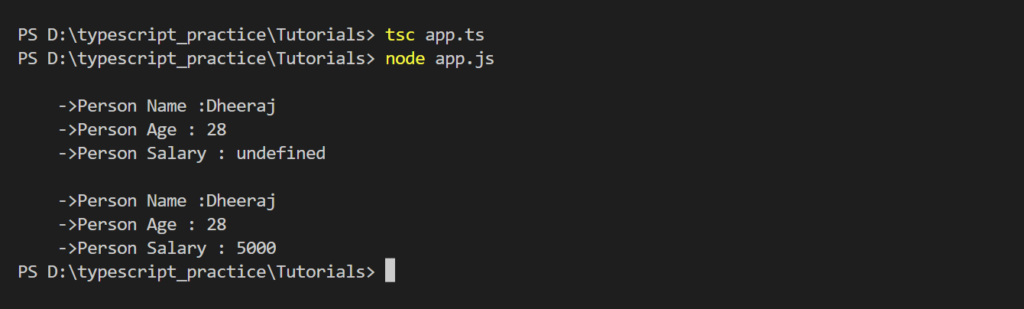
    function displayDetails(person:{name:string,age:number,salary:number}){
    return ` ->Person Name :${person.name}\n ->Person Age : ${person.age} \n ->Person Salary : ${person.salary}`

}
console.log(displayDetails({name:'Dheeraj',age:28,salary:200}));  //calling function
In above example we are passing object as parameter in displayDetails function. During specifying object, we have taken all properties of person object and their respective types also.
Compile and Run
tsc app.ts // compile code
node app.js // run code
OutPut:
Optional Properties
Object type can also specify some or all the Properties Optional. To do this we need to add? after Properties name.
   function displayDetails(person:{name:string,age:number,salary?:number}){

    return `
    ->Person Name :${person.name}
    ->Person Age : ${person.age}
    ->Person Salary : ${person.salary}`

}
Here in above example, we have mentioned that salary is optional property of displayDetails function. So, during calling this function we have an option that either we can pass salary value, or we just ignore it.
As shown below
console.log(displayDetails({name:'Dheeraj',age:28})); // not mentioned salary

console.log(displayDetails({name:'Dheeraj',age:28,salary:5000})); //mentioned salary
Compile and Run
tsc app.ts // compile code
node app.js // run code
OutPut:
Union Type
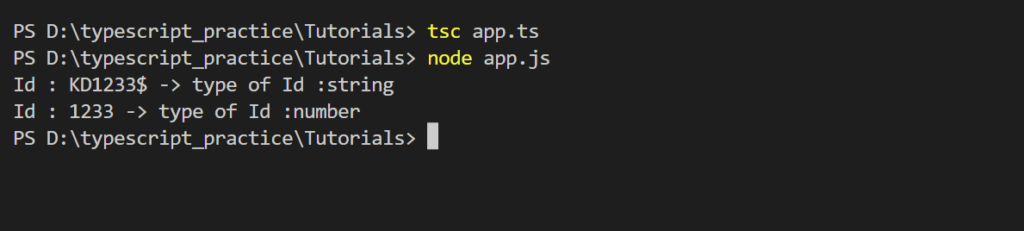
Suppose we must enter employeeId of employees and some of the employee contains its employeeId as number like 1001,2001,4001 and some other employee contains their employeeIds as strings like K20031, B012WR1, SP4081 etc and during this scenario we have a single variable that basically accepts both type of inputs from employee.
Then in that case Union types comes under the picture. So according to Definition of Union type
A Union is a type formed from two or more other types. Representing the values that may be any those types.
To specifying a union type on a variable we just need to mention pipe (|) with that variable type as shown below.
let id=number | string;
Here in this example id will accept both values i.e it may be string, or it may be a number also.
   function printingId(id:number|string){
    return `Id : ${id} -> type of Id :${typeof (id)}`
}

console.log(printingId('KD1233)); // string type
console.log(printingId(1233)) // number type
Compile and Run
tsc app.ts // compile code
node app.js // run code
Currying is transformation of a function that translate a function from callable as f(a,b,c) into callable as f(a)(b)(c). Currying doesn’t call a function it just transform it.
In other words we can say that Currying is breaking down function with multiple arguments one into one or more functions that each accept a single argument.
    /**
      syntax for Currying
     */

     f(a,b,c) => f(a)(b)(c)
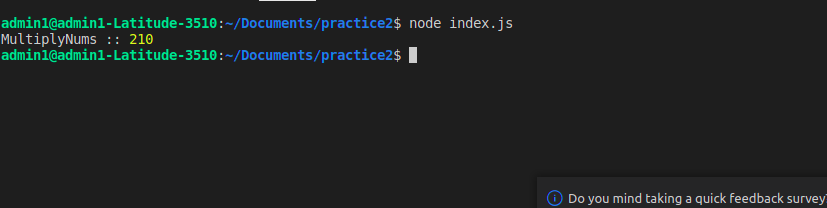
Simple Example for Multiplying Numbers
    /**
      Simple example for multiplying numbers
     */

     const multiplyNums = (a, b, c) => a * b * c;
     console.log("MultiplyNums ::", multiplyNums(5, 6, 7));
After Applying Currying
    /**
      Simple example for multiplying numbers after using Currying
     */

     const curriedMultiplyNums = (a) => (b) => (c) => a * b * c;
     console.log("Currying Multiply Nums ::",curriedMultiplyNums(6)(7)(8))
Hoisting is the process of putting all functions and variables declaration in the memory during compile phase. Hoisting happened on every execution context.
JavaScript only hoists declarations, not the initializations.
Important points about Hoisting
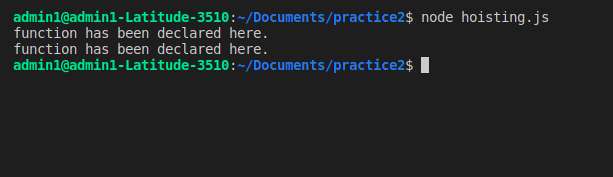
In Javascript functions are fully hoisted. So functions can be accessed from anywhere.
  /**
     function can called before it's declaration
   */

a()
function a() {
    console.log("Function Declarations .....");
    return 1;
}
a()

  /**
     function can called after it's declaration
   */
Note: Hoisting allows us to call functions before even writing them in our code.
var variables are hoisted and initialized with undefined values.
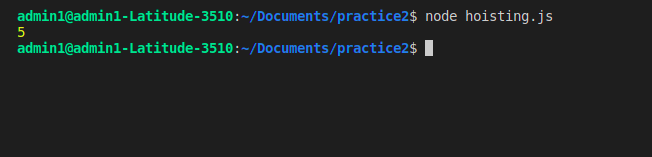
var x=5;
console.log(x);

  /**
     x can be able to access after it's declaration.
   */
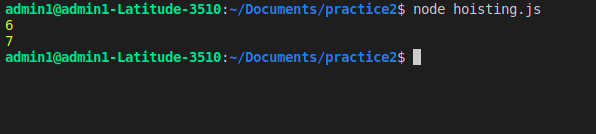
let and const are also fully hoisted and not initialized with any value.
const y=5;
let z=7;
  /**
     y and z can be able to access after declaration
   */

console.log(y);
console.log(z);
If we are going to access a var variable before it’s declaration then it will be undefined.
  /**
     x can't be able to access before declaration if we want to access
     it before then get undefined
   */

console.log(x);
var x=5;
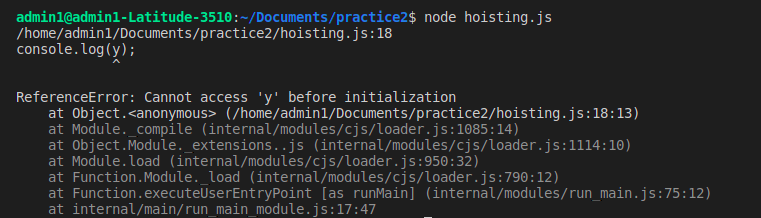
If we are going to access let and const variable before its declaration then it will throw a reference error.
  /**
     y and z can't be able to access before declaration if we want to access
     it before then it will throw reference error
   */
console.log(y)
console.log(z);
const y=5;
let z=7;