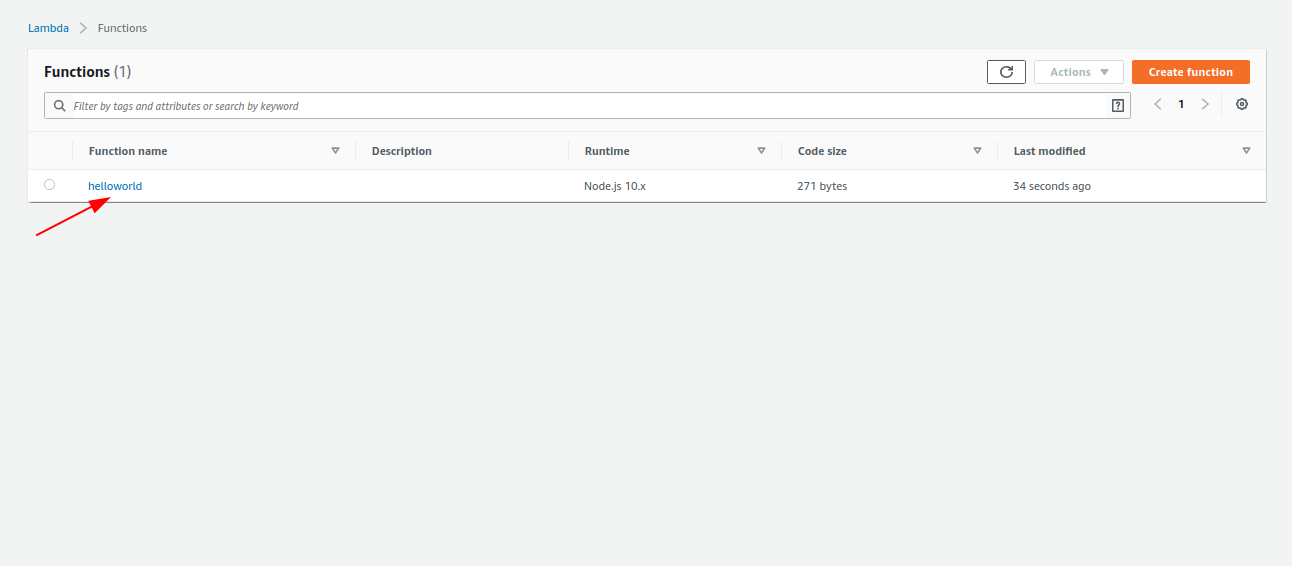
AWS Lambda deploy with Severless

AWS Function

If you are using AWS as a service provider then all function that you are using on AWS platform is known as AWS lambda function.

Serverless

Configuration

All of the lambda functions that we have created can be found in serverless.yml file under functions property.

How to generate serverless file for our Application?

Getting started with Serverless Framework and AWS

Open your Terminal and choose a specific folder

Execute the following command


# Install the serverless cli
npm install -g serverless

# Or, update the serverless cli from a previous version

npm update -g serverless

After that severless-cli has been successfully installed on your system.we can create our project using following command


# Create and deploy a new service/project

serverless

Note: Before going for serverless framework make sure your system should have Node 6 or higher on Your machine, if not then first do that.
After that during the process, it will ask a few questions just follow them

  1. It will ask you log in on serverless or if you no account then create account 
  2. Ask you to give permission for connecting with AWS
  3. Then after on AWS account, it will ask to your account user Iamrole assign it and then after it will generate Access key ID  and Secret access key 
  4. Your terminal will ask for that Access key ID  and Secret access key just enter this information and after that, your project has been successfully created.

After that our Serverless has been successfully created now we have to follow steps for creating our Lambda function and deploy on AWS using serverless framework.

Configuration


service: serverlessex
# app and org for use with dashboard.serverless.com
app: server-app
org: dheerajkumar

# You can pin your service to only deploy with a specific Serverless version
# Check out our docs for more details
# frameworkVersion: "=X.X.X"
provider:
  name: aws
  runtime: nodejs10.x
# you can also these properties 
#  memorySize:512
#  timeout:10
#  versionfunctions:false
#  tracing:true

functions:
  hello:
    handler: handler.hello

handler: property points file and module containing the code you want to run in your function.
During creating a lambda function it will be a common need that we have to maintain folder structure so we have to provide path of lambda function inside our serverless file.
This property is declared inside functions like
permissionsEvery AWS lambda function needs permission to interact with other AWS infrastructure resources within your account.

These roles are set via an AWS IAMRole.

We can set permission policy statements within this role via the property.

provider.iamRoleStatements property.

Environmental Variables: We can add an environment variable configuration to a specific function in serverless.yml by adding an environment object in the function configuration like 


functions:
  hello:

    handler: handler.hello
#    Define function environment variables here
#    environment:
#      variable2: value2

Note: Using an environment variable in a function applies changes to that particular function. But, if we want to apply changes for all functions in our project then we have to need to declare environment variable in provider.


provider:
  name: aws
  runtime: nodejs10.x

# you can also these properties 
#  memorySize:512
#  timeout:10
#  versionfunctions:false
#  tracing:true

# you can define service wide environment variables here
#  environment:
#    variable1: value1

If an environment variable with the same key is defined in the provider level as well as function level then function level key will overwrite the provider level.

Aws Lambda Function

If you are using AWS as a function as a service provider then all the functions that are used as Known lambda function.

Some Important facts about AWS Lambda function

  • Lambda is a pay per use service provided by AWS means to say that when we don’t use lambda then we don’t pay any amount for that time.
  • Lambda automatically runs your code without any need to server manage by you.
  • Lambda is auto-scaling service provided by AWS.
  • AWS Lambda provides an event-driven computing platform.

Benefits of AWS Lambda function

  • No Servers to manage
  • Continuous Scaling 

Steps for Creating a Lambda function

  1. Open the AWS Lambda Console
  2. Choose create a function
  3. Enter function name
  4. Click Create function

Open the AWS Lambda Console

Search For lambda service on AWS console

Choose create a function

After that lambda page will be opened which contains a lambda Create function button.

Enter function name

After clicking on Create Function below page will be opened where we have to add function name like shown below

Click Create a function

Just change the name of Handler that has been already pointed by arrow.

Test your Lambda

For testing your lamda function follow these following steps

Configuration window Open

After that test configuration window will be opened which will be looks like

Configure your test event

Show test result

After clicking Create button your test has been created successfully now you have to need to apply on your lambda.

For applying on your lambda function you need to click on Test button then after that our page look like

Lambda created successfully

Now, your lambda has been created successfully. After that new page will be opened which contains complete detail about your lambda.

Now Lambda listed

Once your lambda has been created successfully then after when you searched for lambda then your lambda will be listed on lambda page like 

Deploy your application with Nginx

Nginx is a web server Software which can also be used as a reverse proxy, load balancer, mail proxy and HTTP cache. Nginx is a free, open-source, high-performance HTTP server and reverse proxy, as well as an IMAP/POP3 proxy server. Nginx is known for its high performance, stability, rich feature set, simple configuration, and low resource consumption.

In above Introduction it has been mentioned that Nginx is a Webserver Software then question arises in our mind.

What is Web Server Software ?

Web server Software decides what get served.

  • A web server is a program that uses HTTP (Hypertext Transfer Protocol) to serve the files that form web pages to users in response to their requests, which are forwarded by their computer’s HTTP clients.
  • So all your static files and sometimes dynamic routes are identified by it and they map the path the component of URL to the local files and application.

Some Key Points regarding Nginx :

  1. Nginx is Pronounced as “Engine X”.
  2. It is a high performance web server designed to deliver large amounts of static contents at good speed by efficiently using system resources.
  3. Main Purpose of developing Nginx is to tackle C10K problem which means serving 1000 concurrent connections.
  4. Nginx can be used as standalone webserver, or serve in front of other webservers as a reserve proxy.

Advantages of Nginx

      • Nginx is fast
    • It comes with additional features to maintain SSL/HTTP,GZIP cache headers, load balancing is fast

and a lot of further stuff.

  • Nginx uses an asynchronous event-driven model which provides more predictable performance load.
  • It can be used as reserve proxy.
  • It paid version comes with advance security and DDOS mititgation.

Installing nginx is very Simple

You can install and perform Nginx Operations using following these commands

Nginx Command
To install Nginx sudo apt-get install nginx
To Satrt Nginx sudo service nginx start
To Stop Nginx sudo service nginx stop
To restart Nginx sudo service nginx restart
To reload Configuration sudo service nginx reload

Now let’s ready for installing Nginx so just execute command and Nginx will be installed on your machine.


sudo apt-get install nginx

Install-nginx

Start Nginx

strat-nginx

After executing this command your Nginx server will be started now go to your web browser and type localhost and press enter after that your page will be look like this.

It means our server is started now and now, it’s time to host your application on Nginx and for that purpose to we have need to make some changes inside our Nginx default file which is available inside


/etc/nginx/sites-available 

So, open your terminal and type command


cd /etc/nginx/sites-available

Now, execute ls command inside your terminal and you will found that there is a file “default” is existing inside that folder

So open default folder and make some changes after executing following command


sudo nano default

Now, Your default file has been opened now remove all lines from file and for doing so just type command ctrl+k


server {
#Lines with hash means commented lines
#root location of file 
#As in my case my file location is root /home/dheeraj/Blogs/nginxExample;
 root /home/dheerajBlog/nginxExample;
}

Note: nginxEngine folder it contains a index.html file which is looks like

index.html


<html> 
<head> 
<!--- Importing bootstarp files --> 
<!-- CSS files -->  <link rel="stylesheet" href="https://maxcdn.bootstrapcdn.com/bootstrap/4.0.0/css/bootstrap.min.css" integrity="sha384-Gn5384xqQ1aoWXA+058RXPxPg6fy4IWvTNh0E263XmFcJlSAwiGgFAW/dAiS6JXm" crossorigin="anonymous"> 
<!--Scripting files --> 
<script src="https://code.jquery.com/jquery-3.2.1.slim.min.js" integrity="sha384-KJ3o2DKtIkvYIK3UENzmM7KCkRr/rE9/Qpg6aAZGJwFDMVNA/GpGFF93hXpG5KkN" crossorigin="anonymous"></script> 
<script src="https://cdnjs.cloudflare.com/ajax/libs/popper.js/1.12.9/umd/popper.min.js" integrity="sha384-ApNbgh9B+Y1QKtv3Rn7W3mgPxhU9K/ScQsAP7hUibX39j7fakFPskvXusvfa0b4Q" crossorigin="anonymous"></script> 
<script src="https://maxcdn.bootstrapcdn.com/bootstrap/4.0.0/js/bootstrap.min.js" integrity="sha384-JZR6Spejh4U02d8jOt6vLEHfe/JQGiRRSQQxSfFWpi1MquVdAyjUar5+76PVCmYl" crossorigin="anonymous"></script> 
<!--Scripting files --> 
</head> 
<body> 
<div class="container-fluid">
<h2 class="bg-success text-white text-center">
Hello Nginx Server</h2>
<h7>this is my first nginx Example ....</h7>
 </div> 
</body> 
/html> 

Now Open Your terminal and type command


sudo service nginx start

After that in Browser type


localhost

And reload your page and your page will be look like this

MongoDb installation on Windows 32 bit System
Rest API in Angular 4
Angular 4 Service Tutorial
Angular 4 Component Tutorial