Building Better Objects with Creational Design Patterns in JavaScript

As a JavaScript developer, you know that creating and managing objects can be a challenging task, especially as your projects grow in complexity. That’s where creational design patterns come in – they provide a proven blueprint for object creation that can help you write more efficient, scalable, and maintainable code.

In this blog post, we’ll explore the world of creational design patterns in JavaScript and discover how they can help us build better objects. We’ll start by introducing the basics of creational design patterns, discussing their advantages and disadvantages, and exploring some common patterns like the factory pattern, the builder pattern, and the singleton pattern.

By the end of this post, we’ll have a solid understanding of how to use creational design patterns to create more flexible and reusable objects, improve the performance and reliability of our code, and take our JavaScript skills to the next level. So, let’s get started!

In this post, we are going to start with Factory Pattern then after we will cover other patterns one by one :

Factory Pattern

The Factory Pattern is a creational design pattern that provides an interface for creating objects but allows subclasses to alter the type of objects that will be created. This pattern is often used when you need to create a large number of similar objects, or when the process of creating an object is complex and involves a lot of boilerplate code.

Factory Pattern is used to simplify Object Creation.

In JavaScript, the Factory Pattern is typically implemented using a factory function, which is a function that returns an object. The factory function can take arguments and use them to customize the object that it creates.

How to Create Factory Pattern in Javascript?

To Create a Factory Pattern in Javascript we need to follow the following steps:

Step 1: Creating a Factory Function

To create a factory function, we’ll need to define a function that returns an object.

Here’s an example:


  function createCar(make, model, year) {
    return {
      make: make,
      model: model,
      year: year,
      drive: function() {
        console.log(`Driving the ${this.make} ${this.model}...`);
      }
    };
  }
  

In this example, the createCar function takes three arguments: make, model, and year. It then returns an object that has properties for make, model, and year, as well as a drive method that logs a message to the console.

Step 2: Implementing the Factory Function

To use the factory function, we’ll need to call it and pass in any arguments that it requires.

Here’s an example:


const car1 = createCar('Honda', 'Civic', 2022);
const car2 = createCar('Toyota', 'Corolla', 2022);
  

In this example, we’re calling the createCar function twice, passing in different arguments each time. This will create two separate objects, one for a Honda Civic and one for a Toyota Corolla.

Step 3: Using the Factory Function

Once we’ve created the objects using the factory function, we can use them just like any other object in JavaScript.

Here’s an example:


  car1.drive(); // logs "Driving the Honda Civic..."
  car2.drive(); // logs "Driving the Toyota Corolla..."
  

In this example, we’re calling the drive method on each of the objects created by the factory function. This will log a message to the console indicating that we’re driving the corresponding car.

Pros and Cons of Factory Pattern in Javascript

Pros

  1. Encapsulation: The Factory Pattern encapsulates object creation and allows you to create objects without exposing the creation logic. This helps to keep your code organized and easy to maintain.
  2. Abstraction: The Factory Pattern provides an abstraction layer between the object creation and the client code, making it easy to change the object creation process without affecting the client code.
  3. Flexibility: With the Factory Pattern, you can create objects dynamically at runtime, based on user input or other conditions. This makes it a flexible and versatile pattern for object creation.
  4. Reusability: The Factory Pattern promotes code reusability by providing a centralized place for object creation logic. This reduces code duplication and makes it easier to maintain and modify the code.

Cons

  1. Complexity: The Factory Pattern can add some complexity to your code, especially if you need to create many different types of objects. It can also be difficult to understand and implement for beginners.
  2. Performance: The Factory Pattern can have a negative impact on performance if the factory function is called frequently or if the object creation process is resource-intensive.
  3. Coupling: The Factory Pattern can create tight coupling between the factory and the created objects, which can make it difficult to change the object creation process later.

Singleton Pattern

The Singleton Pattern is a design pattern that restricts the instantiation of a class to a single instance and provides a global point of access to that instance. In JavaScript, you can implement the Singleton Pattern using a simple object literal or a constructor function.

Here’s an example of how to create a Singleton using an object literal:


  const singleton = {
    instance: null,
    getInstance: function() {
      if (!this.instance) {
        this.instance = { 
          // properties and methods of your singleton object
        };
      }
      return this.instance;
    }
  };
  

In this example, we define a singleton object that has an instance property and a getInstance method. The getInstance method checks whether the instance property is null, and if so, it creates a new instance of the object. If the instance property is not null, it simply returns the existing instance.

To use the Singleton, you can call the getInstance method:


  const mySingleton = singleton.getInstance();
  

This will either create a new instance of the object or return the existing instance, depending on whether an instance has already been created.

Here’s an example of how to create a Singleton using a constructor function:


  function MySingleton() {
    if (!MySingleton.instance) {
      MySingleton.instance = this;
      // properties and methods of your singleton object
    }
    return MySingleton.instance;
  }

In this example, we define a MySingleton constructor function that checks whether the instance property is null and creates a new instance of the object if it is. We also set the instance property to the current object using this, and return the instance.

To use the Singleton, you can create a new instance of the MySingleton constructor function:


  const mySingleton = new MySingleton();

This will either create a new instance of the object or return the existing instance, depending on whether an instance has already been created.

The Singleton Pattern offers several advantages, including easy access to a single instance of an object, and control over the instantiation process. However, it can also have some drawbacks, such as tight coupling between the Singleton object and other parts of your code, and difficulty in unit testing. It’s important to weigh the pros and cons of using the Singleton Pattern in your specific use case and to use it judiciously.

Pros and Cons of Singleton Pattern in Javascript

Pros

  1. Easy access to a single instance: The Singleton Pattern provides a global point of access to a single instance of an object, making it easy to access that object from anywhere in your code.
  2. Control over the instantiation process: By restricting the instantiation of a class to a single instance, the Singleton Pattern gives you control over the creation of that object and ensures that only one instance is created.
  3. Conserves resources: By limiting the number of instances of an object, the Singleton Pattern can help conserve resources in your application.
  4. Provides a shared state: Because there is only one instance of the object, it can be used to maintain a shared state across your application.

Cons

  1. Tight coupling: The Singleton Pattern can lead to tight coupling between the Singleton object and other parts of your code. This can make it difficult to change the behavior of your code without also changing the behavior of the Singleton object.
  2. Hard to unit test: Because the Singleton object is global, it can be difficult to unit test your code in isolation. This can make it harder to catch bugs and maintain your code over time.
  3. Can lead to code bloat: Because the Singleton object is global, it can be easy to add too many properties and methods to the object, leading to code bloat and decreased maintainability.
  4. Can lead to unexpected behavior: Because there is only one instance of the object, any changes made to that object will be reflected across your application. This can lead to unexpected behavior and make it harder to reason about your code.
How to encrypt and decrypt Data using node.js

Encryption and Decryption are basically used for security purposes. We convert our actual data in some other form using some algorithms sha, RSA, etc during encryption. Vice versa we convert our encrypted data into actual forum during decryption.

In Node.js for Encryption and Decryption, we use crypto
package.

During Encryption and, Decryption we use security keys to make our encryption more strong.

For Encryption and, Decryption, we also used term encoding and decoding. During encryption, we encode our data and during decryption, we decode our data. 

Now we will write code for encrypting our data then after we will write code for decrypting our data.

But before that at first, we will declare our security keys that we are using for encryption and decryption.


// Declare package
var crypto = require('crypto');
// Declareing secret_key
let secret_key = 'encrypton_decryption';
// Declare secret_iv
let secret_iv = 'encrypton_decryption_iv';
// Declare encryption method
let encrypt_method = "AES-256-CBC";

Then after we will write code for encrypting our data as shown below.


const encryptData = async function (data) {
  let key = crypto.createHash('sha256').update(secret_key).digest('hex').substr(0, 32);
  let iv = crypto.createHash('sha256').update(secret_iv).digest('hex').substr(0, 16);
  let cipher = crypto.createCipheriv(encrypt_method, key, iv);
  let encrypted = cipher.update(data, 'utf8', 'base64');
  encrypted += cipher.final('base64');
  return Buffer.from(Buffer.from(encrypted).toString('utf8')).toString('base64');
}

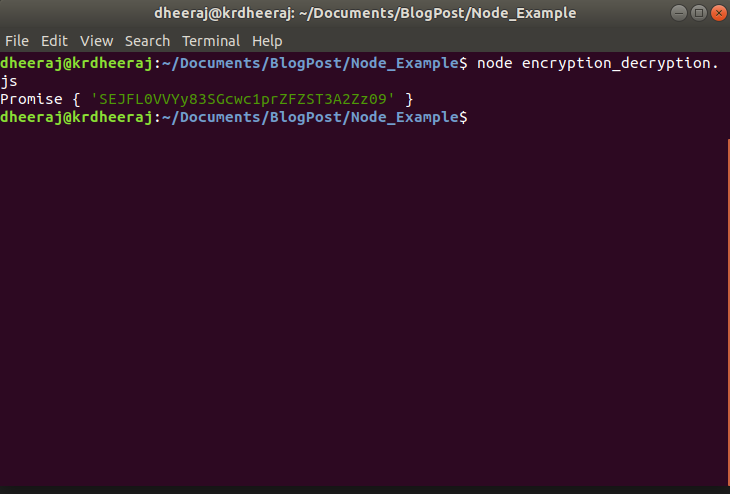
For calling this function we write these lines of code


let hw = encryptData("hello");
console.log(hw);

OutPut:
encrypt data
Now for decryption of our data, we will write these lines of code


const decryptData = async function (data) {
  let key = crypto.createHash('sha256', secret_key).update(secret_key).digest('hex').substr(0, 32);
  let iv = crypto.createHash('sha256', secret_key).update(secret_iv).digest('hex').substr(0, 16);
  var decipher = crypto.createDecipheriv(encrypt_method, key, iv);
  var dec = decipher.update(Buffer.from(data, 'base64').toString('ascii'), 'base64', 'utf8');
  dec += decipher.final('utf8');
  return Buffer.from(dec).toString('utf8');
}

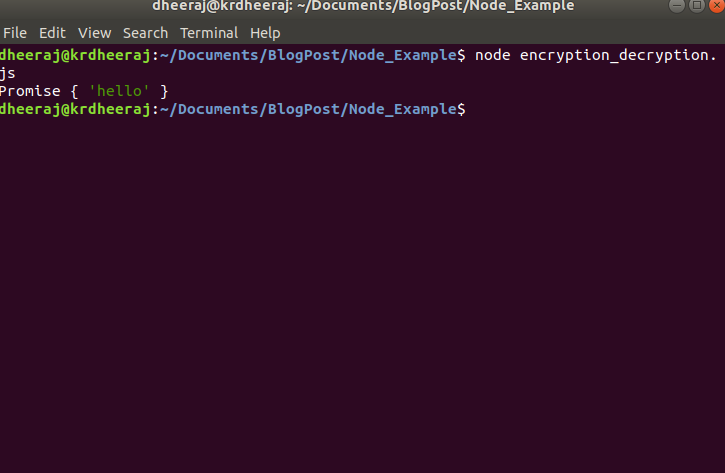
And during calling decryptData function we will pass encrypted data that has been obtained from encryptData function as shown below


let decryphw = decryptData('SEJFL0VVYy83SGcwc1prZFZST3A2Zz09');
console.log(decryphw);

OutPut:

How to use Sequelize in Node.js

Sequelize is a promise-based Node.js ORM for Postgres, MySQL, MariaDB, SQLite, and Microsoft SQL Server. Its features are solid transaction support, relations, eager and lazy loading, read replication, and many more.

Here we explaining an example of a Database connection with MySQL using Squeeze.

Features of Sequelize:

  • Sequelize is a third-party package to be precise its an Object-Relational Mapping Library(ORM).
  • Standardization ORMs usually have a single schema definition in the code. This makes it very clear what the schema is, and very simple to change it.
  • No need to learn SQL – Queries are written in plain JavaScript. So there is no need to learn SOL.

Setting up a Node.js app:

Start Node.js app using the following command:


// initialise npm
npm init

Installation of Required packages:

Sequelize needs the MySql module installed in your project. if you have not installed MySql module then make sure before installing Sequelize you need to install MySql2 module. You need to install this module by using the following command.


// install mysql2
npm install mysql2

After installing the MySql2 module, we have to install Sequelize module to install this module by using the following command.


// install sequelize
npm install sequelize

Requiring module:

For including sequelize in our application we have to add these few lines


// include sequelize
const sequelize = require('sequelize');

For this application, we are creating two files

index.js

databaseConnection.js

databaseConnection.js : explain data onnection using sequelize


//include sequelize
const sequelize = require('sequelize');
// create new object for Database connection
const Sequelize = new sequelize(
    'sequelize_database_db',
    'root',
    'root',
    { 
        host: "localhost",
        dialect: "mysql"
    })

// export module

module.exports = Sequelize;

index.js : calling database connection script and run application


// import database connection module 
const Sequelize = require('./databaseConnection');
// sequelize db Connection ...
Sequelize
    .authenticate()
    .then(() => {
        console.log('Connection has been established successfully.');
    })
    .catch(err => {
        console.error('Unable to connect to the database:', err);
    });

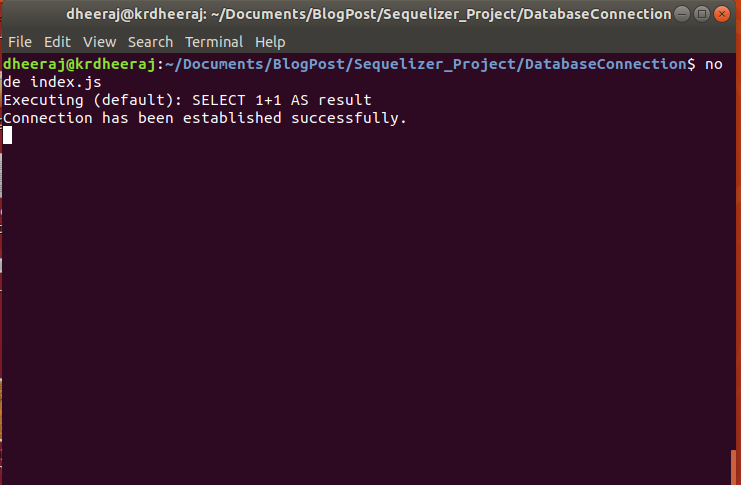
Run application : Open terminal and run command


// Run app 
node index.js

OutPut:
sequelize dbconnection

you can download project from here.

download from git

Get Latest CSV file from Folder using Node.js

getLatestFile.js


/***
 * Read lestest file property 
 * 
 */

const fs = require('fs')
async function getLatestFile() {
    const dirPath = '/home/dheeraj/Documents/BlogPost/Downloads';
    let dirCont = fs.readdirSync(dirPath);
    let files = dirCont.filter(function (elm) { return elm.match(/.*\.(csv)/ig); });
    for (let fileP = 0; fileP < files.length; fileP++) {
        let filsStats = fs.statSync(dirPath + "/" + files[fileP]);
        if (new Date(filsStats['birthtime']).getDate() === new Date().getDate() &&
            new Date(filsStats['birthtime']).getMonth() === new Date().getMonth() &&
            new Date(filsStats['birthtime']).getFullYear() === new Date().getFullYear() &&
            new Date(filsStats['birthtime']).getHours() === new Date().getHours() //&& 
        ) {
            return {
                fileName: files[fileP],
                fileLocation: dirPath + "/" + files[fileP]
            };
        }
    }
    return {
        fileName: 'orderFailed.png',
        fileLocation: dirPath + "/" + 'orderFailed.png'
    };
}

Generate test case
getLatestFile.test.js


const {getLatestFile} = require('./getLatestFile')

async function getLatest (){
    let latest = await getLatestFile();
     console.log(latest);
}

getLatest();

OutPut:

Download Code From git Repo

Regex with JavaScript Part 3

Match WhiteSpaces

During searching or matching a string. We come across a situation where we need to match spaces in String literals.

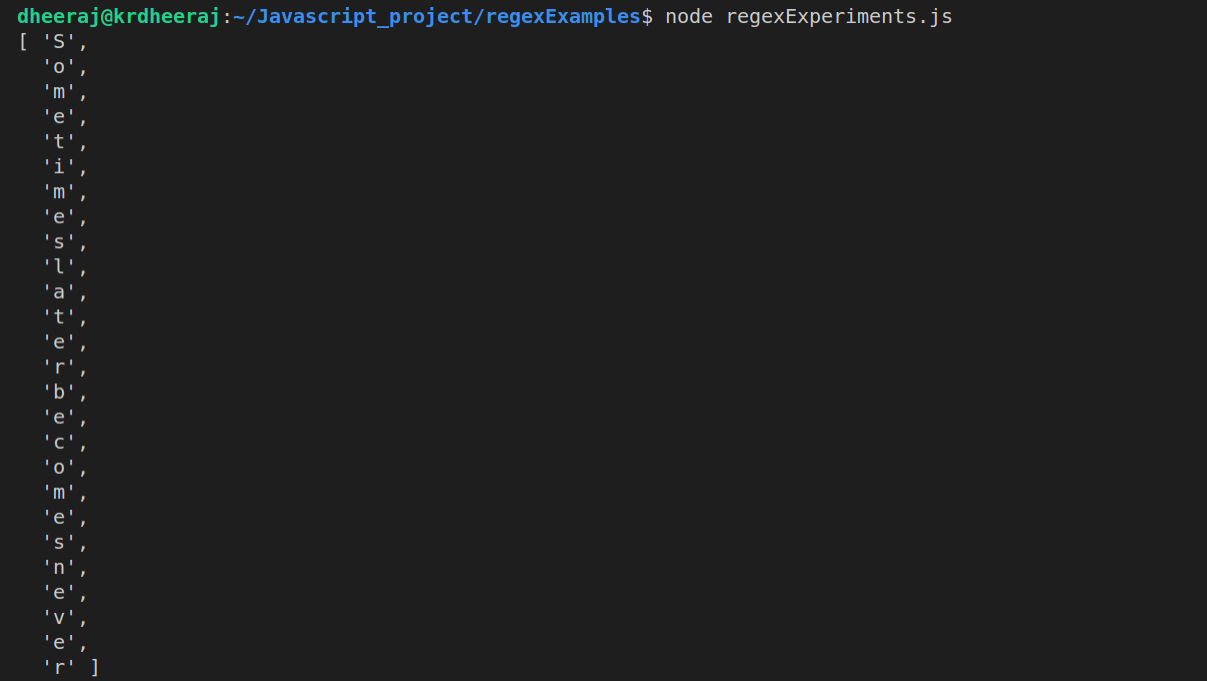
For matching spaces in String literals, we use \s  which is a lowercase s.

Example:


/**
* Checking for WhiteSpaces
*/

let checkForWhiteSpaces = "Remove WhiteSpaces from everywhere";
let spaceRegex=/\s/g;
console.log(checkForWhiteSpaces.match(spaceRegex));

OutPut:

Match Non-Whitespace Characters

Previously we had seen for searching white spaces using /s which lowercase s.

Here we are looking for searching Non-Whitespace and that can be done using /S , yes using upperCase s.

Example:


/**
 * Checking for WhiteSpaces
 */

 let checkForWhiteSpaces = "Remove WhiteSpaces from everywhere";
 let spaceRegex=/\s/g;
 console.log(checkForWhiteSpaces.match(spaceRegex));

OutPut:

Specify Upper and Lower Number of Matches

We can specify the lower and upper number of patterns with quantity specifiers.

Quantity specifiers are used within curly brackets ({ and }).

Example:


/**
 * specify upper and lower number of match
 */

let myString ="mmmmmmmk";
let mySecondString ="mk";
// match word "mmmmmmmk" only it has minimum 2 and maximum 4 'm'
let myRegex=/m{2,4}k/;
console.log(myRegex.test(myString));
console.log(myRegex.test(mySecondString));

OutPut:

Specify Only the Lower Number of Matches
Passed

Sometimes we need to match only a lower number of matches.

So To specify a lower number of matches keep the lower number of matches followed by comma in curly bracket ( { n, } ).

where n is a lower number.

Example:


/**
* specify lower number of match
*/

let myString ="pinnnnnnnnnnk";
let mySecondString ="pinnk";
// match word "pinnk" only it has four or more letter of n
let myRegex=/pin{4,}k/;
console.log(myRegex.test(myString));
console.log(myRegex.test((mySecondString)));

OutPut:

Specify Exact Number of Matches

Sometimes we need to specify an exact number of matches.

To specify an exact number of pattern just add that number in curly bracket.

Example:


/**
* specify exact match
*
*/

let myString = "apple";
let mySecondString ="aple";
//p should be appear two times
let myRegex = /ap{2}l/;
console.log(myRegex.test(myString));
console.log(myRegex.test(mySecondString));

OutPut:

Check for All or None

Sometimes we are not sure about the pattern that we are searching for. 

In that case, we use ‘?’ i.e question mark which check for zero or one of the preceding element.

In other words, we can also say that the previous character is optional i.e if that exists then fine and if not then also no problem.

Example:


/**
*
* Check for All or None
*/


let american ="favorite";
let british ="favourite";
let regexPattern = /favou?rite/;

//In this example 'u' is optional
console.log(regexPattern.test(american));
console.log(regexPattern.test(british));

OutPut:

Positive and Negative Lookahead

Lookaheads are patterns in Javascript that tells to Javascript to look-ahead in your string to check for pattern further long.

It can be helpful during searching multiple patterns on the same string.

There are two kinds of Lookaheads :

  • Positive lookahead
  • Negative lookahead

Positive lookahead :

– Look to make sure the element in the search pattern is there, but won’t actually match it.

– Positive Lookahead is used as (?= …)

– Where  the ... is the required part that is not matched.

Negative lookahead :

– Look to make sure the element in the search pattern is not there.

– Negative lookahead is used as (?!...) 

– where the ... is the pattern that you do not want to be there.

Example:


/**
 * lookahead 
 * 
 */

 let myPassword = "ohMyGod123";
 let mySecondPassword ="ohmyGod";
 // regex for a string greater than 5 character long and don't begin with number and have two consequitive numbers
 let myRegex = /^(?=\w{6}(?=\D+\d{2}))/;
 console.log(myRegex.test(myPassword));
 console.log(myRegex.test(mySecondPassword));

OutPut:

Check For Mixed Grouping of Characters Passed

Sometimes we need to match a group of Characters using regular expression.
We can achieve that using () i.e parenthesis.

Example :


/**
*  Mixed grouping Characters
*/

let myString = "laptop";
// check for multiple group of characters
let myRegex = /(lap|Desk)top/;
console.log(myRegex.test(myString));

OutPut:

Reuse Patterns Using Capture Groups

Some patterns are multiple times in a string. Then it is wastage of time to write the pattern multiple times for searching in a string.

Example:


/**
* Reuse patterns using capture Groups
*
*/

let myString ="mummy mummy mummy";
let myRegex = /(\w+)\s\1/;

console.log(myRegex.test(myString));

console.log(myString.match(myRegex));

OutPut:

Use Capture Groups to Search and Replace

We can search and after that replace in string using .replace().

.replace() contains two parameters :

  • First parameter the string that we are searching for
  • Second parameter the string from which we want to replace.

Example:


/**
* Capture group for search andd replace
*/

let myString= "Baba Black Sheep";
// replace Baba Black sheep with Sheep Black Baba
let myRegex = /(\w+)\s(\w+)\s(\w+)/
let myReplacementString= '$3 $2 $1';
console.log(myString.replace(myRegex,myReplacementString));

OutPut:

Remove Whitespace from Start and End

Sometimes we come across the problem that some string contains unwanted whitespaces and that we need to remove these whitespaces from our string.
For removing start and end whitespaces from a string from we use .trim()
method.

Example:


/***
* removing whitespace from string using .trim()
*/

let hello = "   Hello, World!  ";

let result = hello.trim();
console.log(result);

OutPut:

Regex with Javascript Part 2

In the previous post, we have started Regex with JavaScript and discussed some important points of Regex in JavaScript.

In today’s post, we are going to continue with the same topic.

Match Single Character with multiple possibilities

In the previous, we have discussed match pattern where we had dealt with a string pattern (/string/) and wildcard both (/./) and both have its own significance.

Where one finds the exact match and one works with everything.
We can also enhance this search using Character classes.
Character classes allows us to define a group of characters after placing them in square bracket ([ ]).

Example:


/**
 *  range number
 */


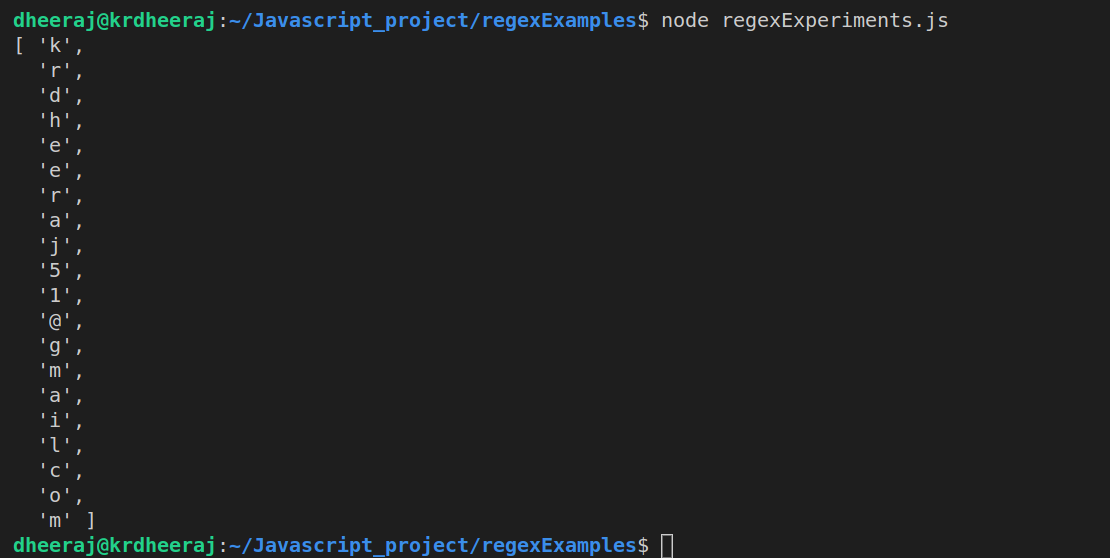
 let emailString = "krdheeraj51@gmail.com";
 let regexString = /[a-z@0-9]/g;
 console.log(emailString.match(regexString));

OutPut:

Match letters of Alphabet

In the case of Character match pattern, we can also define a range.
Suppose we have taken all characters from are then we can define our character classes like [a-e];

Example:


/**
* Character classes
*/

let catStr = "cat";
let batStr = "bat";
let ratStr = "rat";
let bgRegex = /[a-e]at/;

console.log(catStr.match(bgRegex));
console.log(batStr.match(bgRegex));
console.log(ratStr.match(bgRegex));

OutPut:

Match Numbers and letters of Alphabet

( – ) is not limited to matching range of character as we have seen previously. But it will also work to match a range of numbers.
For matching a number in between 10 to 15 we can write down like [ 10-15 ].

Example:


/**
*  range number
*/

let emailString = "krdheeraj51@gmail.com";
let regexString = /[a-z@0-9]/g;
console.log(emailString.match(regexString));

OutPut:

Match Single Characters not specified

Till now we have created a set of characters that we want to match.
We can also create a set of characters that we don’t want to match and these types of character sets are known as negated character set.

For using the negated character set we have to use caret character ( ^ ).

Example :

previous post

/**
* Ignore 0 to 9 and all vowel character
*
**/previous post

let quoteSample ="4th Umpire";
//create a regex for Ignore 0 to 9 and all vowel character
let myRegex = /[^0-9^aeiou]/gi;
console.log(quoteSample.match(myRegex));

OutPut:

Match Character that Occurs one or more time

Some times we need to match a group of Character that appears one or more than once.

We can check this case using + character. 

Remember::  In this case Character should be repeated consequently.

It means Character is being repeated one after another.

previous post suppose our String is “abc” and we are using our regex /a+/g then it will return [“a”].

But if our String is like “aabc” then it will return [“a”,”a”].

Example :


/**
* Handle case of matching zero or more Character
*/


let myString = "fuuuuuuuuuuun!!";
let realString = "It is funny time."
let moreString = "Not Interested.";

let myRegex = /fu*/i;

console.log(myString.match(myRegex));
console.log(realString.match(myRegex));
console.log(moreString.match(myRegex));

OutPut:

Match Characters that Occur Zero or More Times

The previous scenario handled the situation of occurring a Character one or more times.
At this time we will handle the same case of occurring a Character that may be occurred zero or more times.
Fo that that purpose we will use * Character.

Example:


/**
* Handle case of matching zero or more Character
*/

let myString = "fuuuuuuuuuuun!!";
let realString = "It is funny time."
let moreString = "Not Interested.";

let myRegex = /fu*/i;

console.log(myString.match(myRegex));
console.log(realString.match(myRegex));
console.log(moreString.match(myRegex));

OutPut:


More Post on Regex

Regex with Javascript


Regex with Javascript

Regex stands for Regular Expressions also known as Regexp are special strings that represent a search pattern.

For programmers, Regex is like pills that make our task easy.

Regex contains special meaning for some characters that we will explain in further discussion during this post.

Now we will perform some action using functions of Regular Expression.

Match String Using test() method :

As we know that Regex is used to match parts of string.
So, if we want to find “foodie” in the string “Tommy is a foodie.” then we have to use /foodie/ as expression.

Now /foodie/ is our Regex.

Note: Quote marks are not required within regular expression.

JavaScript has multiple ways to use Regex. One of the ways is to use test() method which returns true or false.

Syntax :


regex.test(string)
//return true or false

Example :


var myString = "Codeteaser";
//if our search pattern is teaser from above String
var myRegex = /teaser/;
console.log(myRegex.test(myString));

OutPut:

Match String Literals

We can follow the same approach with String Literals as we have followed previously for matching a string pattern form a strong. In this case, I am taking the same example which I had discussed at the beginning of the post.

Example :


var myStringLterals = "Tommy is a foodie.";
//Search for foodie from string literal
var myRegex =/foodie/;
console.log(myRegex.test(myStringLterals));

OutPut:

But from this approach another form of foodie like Foodie, FOODIE will not match.

Example :


var myStringLterals = "Tommy is a foodie.";
//Search for foodie from string literal
var myRegex =/Foodie/;
console.log(myRegex.test(myStringLterals));

OutPut:

Searching Multiple Option at a time

If we have a string literal “Ronny has a pet cat.” and we are not sure about pet name i.e it is cat or dog or whatever it is. But if we have to add as search pattern on this specific string literal then, in this case, we can follow this approach as shown below.

Example :


var myStringLiteral ="Ronny has a pet cat."
// search for pet name but not sure about pet name
var myRegex = /dog|cat/
console.log(myRegex.test(myStringLiteral));

OutPut:

Note :

We can search multiple patterns using OR or | operator.

Ignore Cases while matching

During matching pattern in a string literal, we had faced a problem while match pattern remains in different cases i.e upperCase (“A”, ”B”, “C” … “Z”) or lowerCases (“a”,”b”,”c” … “z”).
As we had discussed foodie, Foodie or FOODIE are different patterns and these dissimilarities are due to letter case differences.

So, we can ignore letter cases in pattern match using flags in Regex. There are various flags in Regex and ignoring case we will use i flag.

Example:


var myStringLterals = "Tommy is a foodie.";
//Search for foodie from string literal using i flag
var myRegex =/Foodie/i;
console.log(myRegex.test(myStringLterals));

OutPut:

Extract Matches

So till now, we have worked on pattern is existing or not in a String or String Literal. Now we going to extract match pattern from string.
For that purpose, we have to use .match() method.

Example:


/**
* Extrat match pattern
*/

var myExtractStringLiteral="Selena Gomez is a pop Singer.";
// Looking for match pattern
var myRegex =/Singer/;
console.log(myExtractStringLiteral.match(myRegex));

OutPut:

Find more than first

match() method returns the first pattern from a string or string literal.

Example:


/**
* only find first pattern
*/

var myExtractStringLiteral = "Jonny Jonny yes papa";
// Looking for string pattern from a string literal
var myRegex =/Jonny/;
console.log(myExtractStringLiteral.match(myRegex));

OutPut:

But if a string Literal contains multiple times the same pattern then in that case for returning all string pattern we use the g flag as shown in the upcoming example.

Example:


/**
* return all match pattern from a string literal 
*/

var myExtractStringLiteral = "Jonny Jonny yes papa";
// Looking for all match pattern inside String Literal
var myRegex =/Jonny/g;
console.log(myExtractStringLiteral.match(myRegex));

OutPut:

Match anything with wildCard period

Sometimes we don’t know the exact pattern that we want to match. So, in that case, we have to try all possible words that we think for a matching pattern.
And i.e seriously a tough task.
But Regex contains wildCard character: . (dot)
The wildCard character will match anyone character of string.
The wildcard is also called a dot or period.
For example, if we have to match “hug”, “huh”, “hut” then our Regex pattern would be /hu./

Example:


/**
* wildCrad
*/


var myExtractStringLiteral = "I don't like fun during my working period.";
// Searching for fun
var myRegex =/fu./;
//After using dot it will match one character
console.log(myExtractStringLiteral.match(myRegex));

OutPut:

Note: We will discuss more about Regex in further posts.

Stylish JavaScript with es6

ECMAScript is the Standard version of Javascript with a goal of unifying language specifications and features. All significant Browsers and JavaScript compilers support ECMAScript.

In this post, we will cover some major key points of es6 

Variable with es6
Objects with es6
Function with es6

Variable with es6

Variable Declaration with es6

In JavaScript for declaring a variable var keyword is used.

Example :


# comment line 
var someVariable ="Some thing";
console.log(someVariable)

Output:

javascript variable Decleration

But in case of es6 we have three keywords for Declaring a variable these are let, var , const.

Then question arises

Why es6 contains three keywords for declaring a variable?

 Or

What is the problem with ‘var’ keyword so that ECMAScript was needed to introduce two more keywords?

The biggest problem with var keyword is that we can overwrite a variable declaration without any error.

Example :


/**
* Overwrite a Variable
*/

var someVariable="Something";
var someVariable="Nothing";
console.log(someVariable);

Output:

overwrite variable with Javascript

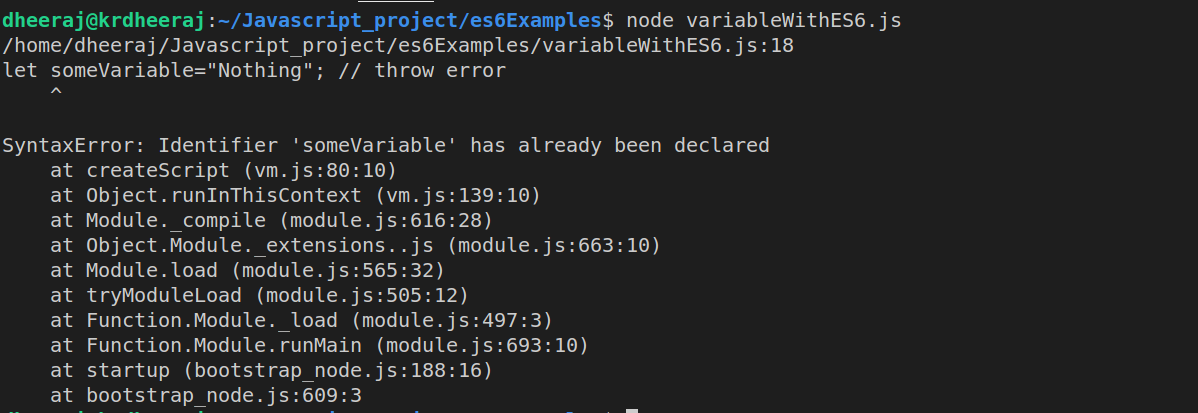
But in case of Declaration with let keyword, we can’t do so.

Example :


/**
* Overwrite a variable with let keyword
*/

let someVariable="Something";
let someVariable="Nothing"; // throw error
console.log(someVariable);

OutPut:

Similarly, const keyword is used for declaring a constant variable inside the complete script.
Example:


/**
* Calculate Area of Circle
*/
Types of Joins
Const PI =3.14
let radius=12m;
console.log("Area of Circle is :: ",(PI*(radius*radius)));

Objects with es6

Objects are similar to Arrays. But in Objects, we can access and modify data with the help of their properties.
But in the case of Arrays, we use indexes to access and modify data.

Objects are Userful for Storing data

Data in a structural way looks like real-world data.


/**
  * Declaring an Object
*/


var book={
  "name":"IKIGAI",
   "author":"Hector Garcia & Francesc Meralies" ,
   "publication":"Penguin"
}

In the above example, Book is an Object and name, author and publication are its properties.

How to access JavaScript Objects?

For accessing JavaScript Object (Same for es6) we can follow these approaches :

  • Accessing JavaScript Object Properties using DotNotation
  • Accessing JavaScript Properties with Bracket Notation
  • Accessing JavaScript Properties with Variables
Accessing JavaScript Object Properties using DotNotation


/**
  *Accessing Javascript Object using DotNotation 
*/

var book={
  "name":"IKIGAI",
   "author":"Hector Garcia & Francesc Meralies" ,
   "publication":"Penguin"
}
//accesing book name
console.log(book.name);
//accessing book author
console.log(book.author);
//accessing book publication
console.log(book.publication);

Output:

Accessing JavaScript Properties with Bracket Notation

We can access the above values also using Bracket Notation.


/**
  *Accessing Javascript Object using BracketNotation 
*/

var book={
  "name":"IKIGAI",
   "author":"Hector Garcia & Francesc Meralies" ,
   "publication":"Penguin"
}
//accesing book name
 console.log(book["name"]);
//accessing book author
console.log(book["author"]);
//accessing book publication
 console.log(book["publication"])

Output:

Accessing JavaScript Properties with Variables

We can also access JavaScript Objet with help of Variables as shown below example. Again in case of Accessing JavaScript Properties with Variables, we are going to use Bracket Notation.


/**
  *Accessing JavaScript Properties with Variables
*/

var favourite = {
      game: "Cricket",  food: "Litti",  movieSeries: "X-man"
  };
  var myFavourite = "food";  //Declaring a new variable
  var myFavouriteFood = favourite[myFavourite];
  console.log("My favourite Food ::",myFavouriteFood); 

OutPut:

In this example, Object favorite contains a set of key-value pairs i.e properties and we will access properties of favorite objects on the basis of a variable myFavorite.

Function with es6

For Declaring a function in Javascript there are several ways.
Simplest way
Simplest way for declaring a function in Javascript is
Syntax:


/**
  *function declaration
*/


function function_name(){

 //function body 
}

Example: Add Two Numbers in JavaScript


/**
  * funtion decalartion
  */
 
 function addNum(a,b){
 
   return console.log("Addition of Two Numbers :: ",a+b);
 
 }
//calling function
 
 addNum(5,6);

OutPut:

Anonymous Function

A function which doesn’t contain its name is known as Anonymous function.
We can perform the same operation using the Anonymous function.
Syntax :


function (){
    //function body 
}

Example:


/**
  * Anonymous function declaration
  */

 
 var addNum =function (a,b){
   
   return console.log("Addition of Two Numbers :: ",a+b);
 }
//calling function
 addNum(5,6);

OutPut:

Arrow function

es6 introduces a new way for function declaration known as Arrow function.
Syntax:


()=>{

  //function body

}

Example:


/**
  * arrow funtion decalartion
  */

 let  addNum = (a,b) =>{
   return console.log("Addition of Two Numbers :: ",a+b);
 }
//call function
addNum(5,6);

OutPut:

Tweet on Twitter using Puppeteer

Puppeteer is the most fantastic library developed by Google chrome and it became more popular day by day due to its versatile functionality.

With the help of Puppeteer, anyone automate his browser-specific task. 

Think about if we can be able to do so then how much time we can be able to save and utilize that in doing some more important task.

We are not dealing basic concept of puppeteer here if you want to go through about basic concept of puppeteer then go for  Introduction to Puppeteer from here you will get a basic idea about Puppeteer.

In the feature, we will be also discussing some new concept about some other concept of Puppeteer.

if you have no experience in software development then in that case also Puppeteer is not rocket science. It has been developed with the basic concept of javascript.

After learning Javascript you can be able to build your own application with Puppeteer and can be able to make your time-consuming task very easy with the help of it.

But In this post, we will discuss something more. In this post, we will build a script for posting a tweeter handler account using puppeteer without any user interaction.

We are creating this post just to show how puppeteer can be able to automate your daily activity with some work.

Now we came to the point and build our script. For implementing this script from our own way we have to consider these few points that we should have.

  1. Node.js should be installed on our system
  2. We should have a twitter account.
  3. Nothing more

Then now it’s time to write script 

Step 1: Create a folder 

Just create a folder of developing your script. Just like I have created 
create twitter App
Step2: Execute npm init command


# Execute npm init 

npm init 

Step3: Install puppeteer using this command


# install puppeteer

npm install puppeteer --save

Step4: Create tweetTeeter.js file inside your folder

Step5: Create these separate function for your entire process like


# comment line
handleBrowser() : for opening and closing the browser.
loginTweeter(): for open twitter page and log in to twitter.
tweetTweeter(): for tweet on twitter.
tweetTwitterWithPuppeteer() : for calling all functions.

Now we have already completed the previous 4 steps now it’s time for implementing 5 steps
handleBrowser()
Note: Before running this code make sure that you have import puppeteer package inside your code.


# require puppeteer
const puppeteer=require("puppeteer");

Now go for handleBrowser() function


# comment line

async function handleBrowser() {

 /**
     * Open Browser 
     */

   
    browser = await puppeteer.launch({
        headless: false,
    })
    //open new page
    page = await browser.newPage();
    //set screen 
    await page.setViewport({ width: 1280, height: 800 })

}

After that, your browser will be opened.
browser open

loginTwitter() : handle login activity.
for implement loginTwitter() function add these few lines of code.

async function loginTweeter() {
    try {
        /** Define twitter fields */
        let twitterAccount = {
            userField: "input[name='session[username_or_email]']",
            passField: "input[name='session[password]']",
            loginSubmit: ".EdgeButton"
        };
        await page.goto('https://twitter.com');

        await page.waitFor(5000);
          /** Enter twitter id */
        await page.waitForSelector(twitterAccount.userField);
        await page.click(twitterAccount.userField);
        await page.keyboard.type('krdheeraj51');
          /** Enter twiiter password */
        await page.waitForSelector(twitterAccount.passField);
        await page.click(twitterAccount.passField);
        await page.keyboard.type('enter twitter password');
          /** Click Button  */
        await page.waitFor(2000);
        await page.waitForSelector(twitterAccount.loginSubmit);
        await page.click(twitterAccount.loginSubmit);
        await page.waitFor(3000);
    } catch (err) {
        console.log(err);
        return err;

    }
}

loginTwitter() : function at first open the login page then after entering your username and password.

And then after click on submit button and you will redirect to twitter home page.

t

tweetTwitter() : function that writes tweet and post from your twitter account and for this purpose write these few lines of code.

async function tweetTweeter() {
    try {
        await page.goto('https://twitter.com/home');
 
        /** 
         * tweet on twitter
         */

        await page.waitForSelector('.DraftEditor-editorContainer');
        await page.click('.DraftEditor-editorContainer');
        
        /**
         * write your twitter post
         */
        await page.keyboard.type("krdheeraj51 #krdheeraj #freelearning #100DaysOfCode #puppeteer #googlechrome  I like Puppeteer because it automate browser-specific tasks.");
        await page.waitFor(3000);
 
        /**
         * Click tweet button for submit post
         */

        await page.waitForSelector('#react-root > div > div > div > main > div > div > div > div.css-1dbjc4n.r-14lw9ot.r-1tlfku8.r-1ljd8xs.r-13l2t4g.r-1phboty.r-1jgb5lz.r-11wrixw.r-61z16t.r-1ye8kvj.r-13qz1uu.r-184en5c > div > div.css-1dbjc4n.r-14lw9ot.r-184en5c > div.css-1dbjc4n.r-156q2ks > div:nth-child(1) > div > div > div.css-1dbjc4n.r-1iusvr4.r-16y2uox.r-15d164r.r-5f2r5o.r-1bylmt5.r-13tjlyg.r-7qyjyx.r-1ftll1t > div:nth-child(2) > div > div > div:nth-child(2) > div.css-18t94o4.css-1dbjc4n.r-urgr8i.r-42olwf.r-sdzlij.r-1phboty.r-rs99b7.r-1w2pmg.r-1n0xq6e.r-1vuscfd.r-1dhvaqw.r-1fneopy.r-o7ynqc.r-6416eg.r-lrvibr')[0];
        await page.click('#react-root > div > div > div > main > div > div > div > div.css-1dbjc4n.r-14lw9ot.r-1tlfku8.r-1ljd8xs.r-13l2t4g.r-1phboty.r-1jgb5lz.r-11wrixw.r-61z16t.r-1ye8kvj.r-13qz1uu.r-184en5c > div > div.css-1dbjc4n.r-14lw9ot.r-184en5c > div.css-1dbjc4n.r-156q2ks > div:nth-child(1) > div > div > div.css-1dbjc4n.r-1iusvr4.r-16y2uox.r-15d164r.r-5f2r5o.r-1bylmt5.r-13tjlyg.r-7qyjyx.r-1ftll1t > div:nth-child(2) > div > div > div:nth-child(2) > div.css-18t94o4.css-1dbjc4n.r-urgr8i.r-42olwf.r-sdzlij.r-1phboty.r-rs99b7.r-1w2pmg.r-1n0xq6e.r-1vuscfd.r-1dhvaqw.r-1fneopy.r-o7ynqc.r-6416eg.r-lrvibr')[0];
        await page.waitFor(5000);
        console.log("Tweet has been posted successfully.");
         /**Close browser */
        browser.close();

    } catch (err) {
        console.log(err);

    }
}

After executing this function your tweet added

Then after posted from your Twitter account.

tweet posted
tweetTwitterWithPuppeteer() : These all functions are handled in a single for performing these complete process in a complete chain which contains these few lines of code.


async function tweetTwitterWithPuppeteer() {
    try {
         /** handle browser activity */
        await handleBrowser();
         /** handle login Activity */
        await loginTweeter();
         /** handle tweet activity */
        await tweetTweeter();
    } catch (err) {
        console.log(err);
        return err;
    }
}

Now Your complete script will be look like


/**
 * require puppeteer library
 */
const puppeteer = require("puppeteer");

async function tweetTwitterWithPuppeteer() {
    try {
 
        /** handle browser activity */
        await handleBrowser();
         /** handle login Activity */
        await loginTweeter();
         /** handle tweet activity */
        await tweetTweeter();
    } catch (err) {
        console.log(err);
        return err;
    }
}
 
/**
 * call tweetTwitterWithPuppeteer() i.e is handling whole process
 */ 
tweetTwitterWithPuppeteer();

async function loginTweeter() {
    try {
         /** Define twitter fields */
        let twitterAccount = {
            userField: "input[name='session[username_or_email]']",
            passField: "input[name='session[password]']",
            loginSubmit: ".EdgeButton"
        };
        await page.goto('https://twitter.com');

        await page.waitFor(5000);
         /** Enter twitter id */
        await page.waitForSelector(twitterAccount.userField);
        await page.click(twitterAccount.userField);
        await page.keyboard.type('krdheeraj51');
         /** Enter twiiter password */
        await page.waitForSelector(twitterAccount.passField);
        await page.click(twitterAccount.passField);
        await page.keyboard.type('enter twitter password');
         /** Click Button  */
        await page.waitFor(2000);
        await page.waitForSelector(twitterAccount.loginSubmit);
        await page.click(twitterAccount.loginSubmit);
        await page.waitFor(3000);
    } catch (err) {
        console.log(err);
        return err;

    }
}

async function tweetTweeter() {
    try {
        await page.goto('https://twitter.com/home');
         /** 
         * tweet on twitter
         */
        await page.waitForSelector('.DraftEditor-editorContainer');
        await page.click('.DraftEditor-editorContainer');
         /**
         * write your twitter post
         */
        await page.keyboard.type("krdheeraj51 #krdheeraj #freelearning #100DaysOfCode #puppeteer #googlechrome  I like Puppeteer because it automate browser-specific tasks.");
        await page.waitFor(3000);
         /**
         * Click tweet button for submit post
         */
        await page.waitForSelector('#react-root > div > div > div > main > div > div > div > div.css-1dbjc4n.r-14lw9ot.r-1tlfku8.r-1ljd8xs.r-13l2t4g.r-1phboty.r-1jgb5lz.r-11wrixw.r-61z16t.r-1ye8kvj.r-13qz1uu.r-184en5c > div > div.css-1dbjc4n.r-14lw9ot.r-184en5c > div.css-1dbjc4n.r-156q2ks > div:nth-child(1) > div > div > div.css-1dbjc4n.r-1iusvr4.r-16y2uox.r-15d164r.r-5f2r5o.r-1bylmt5.r-13tjlyg.r-7qyjyx.r-1ftll1t > div:nth-child(2) > div > div > div:nth-child(2) > div.css-18t94o4.css-1dbjc4n.r-urgr8i.r-42olwf.r-sdzlij.r-1phboty.r-rs99b7.r-1w2pmg.r-1n0xq6e.r-1vuscfd.r-1dhvaqw.r-1fneopy.r-o7ynqc.r-6416eg.r-lrvibr')[0];
        await page.click('#react-root > div > div > div > main > div > div > div > div.css-1dbjc4n.r-14lw9ot.r-1tlfku8.r-1ljd8xs.r-13l2t4g.r-1phboty.r-1jgb5lz.r-11wrixw.r-61z16t.r-1ye8kvj.r-13qz1uu.r-184en5c > div > div.css-1dbjc4n.r-14lw9ot.r-184en5c > div.css-1dbjc4n.r-156q2ks > div:nth-child(1) > div > div > div.css-1dbjc4n.r-1iusvr4.r-16y2uox.r-15d164r.r-5f2r5o.r-1bylmt5.r-13tjlyg.r-7qyjyx.r-1ftll1t > div:nth-child(2) > div > div > div:nth-child(2) > div.css-18t94o4.css-1dbjc4n.r-urgr8i.r-42olwf.r-sdzlij.r-1phboty.r-rs99b7.r-1w2pmg.r-1n0xq6e.r-1vuscfd.r-1dhvaqw.r-1fneopy.r-o7ynqc.r-6416eg.r-lrvibr')[0];
        await page.waitFor(5000);
        console.log("Tweet has been posted successfully.");
         /**Close browser */
        browser.close();

    } catch (err) {
        console.log(err);

    }
}
async function handleBrowser() {
     /**
     * Open Browser 
     */
    browser = await puppeteer.launch({
        headless: false,
    })
     //open new page
    page = await browser.newPage();
     //set screen 
    await page.setViewport({ width: 1280, height: 800 })

}

For executing this script use this command


node filename.js 
/**
 * like here file name is tweetTwiteer.js
*/

You can also download a complete project from  Github

download from git

Introduction to Puppeteer

Puppeteer is a Node.js library that allows you to control Chrome browser from JS code. Most things that you can do manually in the browser can be done using Puppeteer. Here are a few examples to get you started:

Most things that we do manually in the browser.Can be done using puppeteer easily.

What we can do?

  • Scrap web page
  • Automate process on the web
  • Take screenshot of web pages
  • Generate pdf from HTML

How to start with Puppeteer?

For starting with Puppeteer we have to follow these few steps

    1. Install Puppeteer
    2. Load Puppeteer module
    3. Launch Browser
    4. Headless mode
    5. Open tab inside Browser
    6. Open page inside Browser
    7. Close Browser

Install Puppeteer


Installing Puppeteer

Load Puppeteer package

In node.js we load the package using require like


const puppeteer = require('puppeteer');

Launch browser

To launch browser with puppeteer we have to use launch() method


(async () => {
 const browser = await puppeteer.launch();
})();

We can also write this


puppeteer.launch().then(async browser =>{
});

Headless mode

Puppeteer launches chromium in headless mode.

By default puppeteer launch in headless mode i.e


{headless:true}

This means when we will run the application our browser will not be opened.
But during the process, we can make our browser open and for this, we have to make

Open tab inside Browser

nextPage() method on browser object to get page Object.


const puppeteer = require('puppeteer');

(async () => {

const browser=await puppeteer.launch();
const page=await browser.newPage();
});

Open page inside Browser

page.goto() method used for open particular page inside opened browser


const puppeteer = require('puppeteer');

(async () => {

const browser=await puppeteer.launch();
const page=await browser.newPage();
await page.goto("https://google.com/");
});

Close Browser

Textbrowser.close() Used for close browser Once task has been completed.


await browser.close(); 

Example :

Here we are opening google.com using puppeteer


const puppeteer = require('puppeteer');

(async () => {
 const browser = await puppeteer.launch();
 const page = await browser.newPage();
 await page.goto('https://google.com/');
 await browser.close();
})();

For running application we use command
During the above process, the browser will be opened and closed and we can’t be able to track the process. Because in this case {headelss: true}

If we want to track process then, in that case, we have to take {headelss: false}. In this case, the browser will be visualized and we can be able to see steps and debug our code if required.


const puppeteer = require('puppeteer');

const puppeteer = require('puppeteer');

(async () => {
 const browser = await puppeteer.launch({headless:false});
 const page = await browser.newPage();
 await page.goto('https://google.com/');
 await browser.close();
})();

Here we are not dealing with all methods of puppeteer because it has been already done on its official site https://pptr.dev/.

What are we doing here?

Our main purpose is to take an idea of puppeteer and making projects so that we have a good hand on puppeteer.
For this purpose, we need to familiar with some important classes and modules of puppeteer and that we will cover here.

Classes of puppeteer module

These are some important classes of puppeteer module

page method

page class is a very important class in the puppeteer module. Without creating page Object we can’t be able to open a page on chrome browser.

Some methods of page() class

Method Way to write Description
$(selector) await page.$(‘.common’) querySelector on the page.
$$(selector) await page.$$(‘#intro’) querySelectorAll on the page.
goto(url) await page.goto(‘url’) a
Used for open a specified url.
content() await page.content() Get an HTML source of the page.
click(selector) await page.click(‘button#submit’) a
Mouse click event on the element pass as a parameter.
hover(selector) await page.hover(‘input[name=”user”]’) Hover particular elemet.
reload() await page.reload() a
Reload a page.
pdf() await page.pdf({path:’file.pdf’}) Generate pdf for open url page.
screenshot() await page.screenshot({path:file.png’}) Take screenshot of page and save as png format.